
In the Coupons section, you can add coupons and deals that publishers will use to promote and advertise your brand.
Coupons in a program:
- Help publishers better promote your products and services and attract more customers.
- Increase publisher interest in contributing to your program.
Coupons are a useful tool for programs in the "Online stores" and "Online services" categories.
Tool features
In the Coupons section, you can add:
- Coupons: Special offers (e.g., discount on a product, free delivery) that apply when customers place orders using the specified code word.
Example: Get $10 off orders from $200 with promo code MARCH10
- Deals: Activities where discounts or other special offers automatically apply to customers. A deal applies to a specific product category or any order that meets its conditions—meaning the customer doesn't need to enter a special code word.
Example: Free delivery for orders from $150
How to add coupons, deals, and personal promo codes
You can add coupons and personal promo codes:
- Independently by following the instructions below.
- Or through your account manager if you have one. For this, provide the manager with all necessary information about the coupons.
How to add a coupon, deal, or personal promo code on your own
You can add coupons, personal promo codes, or deals:
- Manually, if you need to create one or several coupons or personal promo codes.
- By uploading the data file into the system, if you need to create a large number of coupons at once.
How to add a coupon, deal, or personal promo code manually
Adding a personal promo code based on a publisher's request
1. Go to Advertising tools → Promo code requests.
2. Next to the required request in the Action column, click 
You'll be redirected to the page for adding a new promo code. The field Request ID in the "Promo code requests" tool will be filled in automatically.
3. Check the box for Personal promo code for publisher.
3. Specify the remaining promo code details in each block as described below and click Save.
Ensure you've selected the correct publisher who requested the promo code.
Adding a coupon or deal
1. Go to Advertising tools → Coupons.
2. Click Add new coupon.

3. Fill in all required information about the coupon or deal in each block as described below and click Save.
How to fill out coupon information
-
If you're adding a promo code via the Promo code requests tool, the field Request ID in the "Promo code requests" tool will be filled automatically.
1. In the Brief description field, briefly summarize the essence of the deal or coupon.
Examples:
- $70 discount on flight tickets.
- 30% OFF knitted clothes
- Free hand care cream with every order!
- Free delivery
- Seasonal sale! Get up to 80% OFF!
Don't include detailed terms like "with orders over $100" or "not combinable with other discounts." You can describe all that in the Additional terms field.
If you're creating a deal instead of a promo code, jump to Step 4.
2. In Personal promo code for publisher, check the corresponding box if you want to create a personal promo code.A Personal promo code is a unique promo code that is assigned to a specific publisher. It contains a unique code word used to track target actions. When placing such a promo code, publishers don’t need to use an affiliate link. Additional integration settings may be required to provide publishers with personal promo codes. Learn more
In this case, the Promo code field will automatically set to unique.
3. Actions with the Promo code field depend on the type of promo code you're creating and who it should be available to.- To create a promo code available to a specific publisher, group, or channel, specify the promo code's code word. Do the following:
-
- Click Add another promo code.
- In the new field, enter the promo code's code word and click Customize targeting.
- Flag the target channel or group or enter the publisher's username in the search field and flag it.
- At the bottom of the window, click Apply and go to Step 4.
- To create a personal promo code, make sure the Personal promo code for publisher box is flagged. Do the following:
- Click Add another promo code.
- In the new field, enter the promo code's code word and click Customize targeting.
- In the search field, enter the username of the publisher for whom you're creating a personal promo code and flag it.
- At the bottom of the window, click Apply and go to Step 4.
4. In the Additional terms field, describe the restrictions, requirements, or terms of the deal.Examples:
- Requires entering the promo code.
- The deal applies to (list products or product groups).
- The deal only works for new customers.
- The minimum order amount is XXX.
- Cannot be combined with other discounts.
- Free delivery only in (list cities).
Specify the terms one by one as regular sentences: starting with a capital letter and ending with a period.
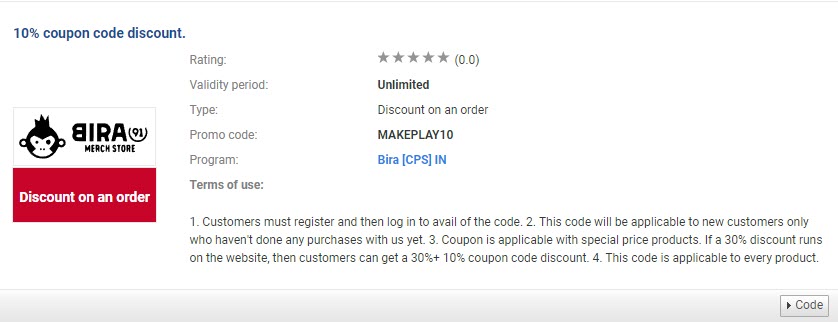
In the publisher's account, the coupon will appear as follows:
5. Select the deal, or coupon language from the Language dropdown list.The selected language must match the language in which you filled out the Brief description and Additional terms fields.
This setting helps publishers quickly find coupons and deals in a language their audience understands.
Now, proceed to the Categorization block setup.
-
2. In the Categories section, check the boxes next to the categories the coupon or deal applies to.
- For instance, if it's 30% off outerwear, choose the Clothing category.
- Choose the category based on the coupon/deal terms rather than your business area. For example, if you run an apparel store, but you are adding a coupon or deal for costume jewelry, choose the Watches & Jewelry category.
2. In the Type of coupon or deal block, select the type that matches your coupon or deal.- Free delivery : Grants free shipping for the order.
- Gift for an order: Adds a free item to the order.
- Order discount.
3. In the Regions block, check the boxes for the countries where the coupon or deal will apply.You can select countries that are specified as regions of your programs in the settings (menu → Program → Program settings → General settings).
When choosing regions, align with the language used to fill out the coupon/deal description and terms:
- If you're adding a coupon with descriptions and terms in German, select only German-speaking countries.
- If the offer is relevant to other countries where people don't speak German, add another coupon with identical terms but in English, selecting the appropriate (non-German-speaking) countries.
- If the coupon is valid only within Spain, specify only Spain in the regions, excluding other Spanish-speaking countries.
After selecting regions, double-check that no countries with users who won't understand the coupon/deal description or where the deal won't work are included.
4. In the Format section:- Promo code, if you are adding a coupon.
- Deal, if you are adding a deal.
5. Special category. Skip this field.Now, proceed to the Additional information block setup.
-
1. In the Time of action field:
- Set the start and end time for the deal. This way, you can add coupons or deals a few days before they actually become active. They'll activate automatically at the appointed time.
- Flag the Lifetime option to keep the deal active until you manually disable it (here's how you can do that).
Note: Start and end times of deals are set in UTC+3, regardless of your time zone. You cannot set a start time earlier than the current UTC+3 time.
If the Lifetime is selected, the start date becomes the current UTC+3 time, regardless of the time zone where the deal or coupon was added.
Example: You're in Astana, where it's 5 PM (UTC+6). The coupon should activate in 30 minutes, at 5:30 PM. Subtract the time difference from UTC+3 (i.e., 3 hours) and set the resulting time as the start time, in this case, 2:30 PM.
However, if it's currently 11:00 AM UTC+3, you cannot set a start time of 10:45 AM on the same date, regardless of your location.
3. In the Notification field, set up a reminder about the coupon/deal expiration to ensure timely renewal or upload of new promo codes or addition of a new deal.To do so:
- Check the box next to Notify.
- Specify how many days in advance you'd like to receive the notification. It will be sent to the email address specified in the account settings.
Remember to enable the corresponding type of notifications in your settings (see these instructions).
3. From the Status dropdown list, select:- Active, if you want the coupon/deal to:
- Become active immediately after addition.
- Activate on the scheduled date and time for deals/coupons with a delayed start.
- Inactive, if you plan to manually activate the coupon/deal later.
4. You can flag the Do not display as "coming soon" option if you don't want to disclose the deal in advance. In this case, it won’t be visible to publishers.Recommendation: Avoid using this option. As long as it's disabled, information about upcoming deals and special offers will be available to publishers in advance. This way, they'll have enough time to design their promos and content plans and attract more customers.
5. In the Transition link, add the link users will use to transition.If you're creating a personal promo code, you don't have to add a link.
To direct visitors directly to the sale page or promotional product, compose and specify the link for the coupon or deal.
Here's how to create a link:
- Copy the landing page link and paste it into the Transition link field.
Example: http://www.site.com/women/sale/ - In the new window, go to Program → Program Profile → General settings. From the Tracking link for the website field, copy the parameters—all characters starting from the question mark.
- Return to the Adding a new coupon or deal page and paste the copied parameters right after the landing page link.
Sometimes the landing page link contains an anchor:
https://www.example-store.com/summer-sale/#product56789In this case, insert the second part of the link with the parameters after “/” but before “#”:
https://www.example-store.com/summer-sale/?admitad_uid={{admitad_uid}}#product56789Don't add a slash before the anchor (after the parameters).
If the Transition link field remains empty after you add the coupon, visitors will land on your site through the standard transition link—i.e., the homepage.
When ready, ensure the Transition Link field is either empty or contains a link with parameters. If the link is added but doesn't contain parameters, target actions won't be tracked.
6. Flag the Exclusive option if the deal or coupon is exclusive to Admitad Partner Network publishers.
7. In the Coupon discount field, enter a discount percentage or an absolute value in a currency (e.g., 13% or $10).Now, proceed to the Promo code or deal targeting block setup.


-
This block is unavailable when adding a personal promo code.
By default, deals or coupons are accessible to all publishers.
If you want to change this, specify in the Channels, Groups, and Publishers fields who will see the coupon or deal.
If you're adding a promo code using the Promo code requests tool, you can target it only to one publisher who has requested it. Ensure you've selected the correct one.
How to add coupons using a file
To add multiple coupons at once:
1. Prepare the upload file.
2. Upload the file to the system.
Preparing the upload file
1. Download the Template_for_uploading_coupons_and_discounts.xlsx file and open it.
The file contains several sheets:
- Create coupons: Your working sheet where you enter coupon data.
- All other worksheets are directories, and you cannot edit them.
These sheets contain values that you can use for the corresponding columns in the Create coupons sheet.
Do not delete or rearrange sheets and columns in the file, or the system won’t process it correctly.
2. Go to the Create coupons sheet and fill out the table columns.
Below the fixed first row, you’ll see an example row with sample data for all columns. Delete it after entering your coupon data.
Below you will see the recommendations for completing the file.
-
Required fields are marked with an asterisk*.
Brief description*. Give a short overview of the deal or coupon.
Maximum length: 100 characters.Examples:
- $70 discount on flight tickets.
- 30% OFF knitted clothes
- Free shipping
This field is not for describing detailed deal terms (e.g., "for orders from $20" or "is not cumulative with any other discount"; this information must be specified in the next column, Additional terms).
Additional terms*. Specify the conditions, restrictions, or requirements the order must meet or comply with to be subject to the discount.
Examples:
- The deal applies to (list products or product groups).
- The deal only works for new customers.
- The minimum order amount is XXX.
Transition link. Specify the link in the format http://example.com/{{admitad_uid}}/, so users land straight on the sale or promotional product page.
If you're creating a personal promo code, you don't have to add a link.
If left blank, a default affiliate link leading to the homepage of the affiliate program site will be used.
Discount value*. Specify the percentage or fixed discount amount.
Format: Integer number, without specifying currency or percentage.
Maximum discount percentage: 99.
Maximum fixed discount amount: Unlimited.
Currency*. Specify the currency code if the discount is a fixed amount. You can choose the currency code from the dropdown list when editing the cell.
Use the % symbol if the discount is a percentage of the cost.
Country*. The coupon will only be displayed to publishers from the selected countries.
To make coupons visible to publishers from multiple countries, list them separated by semicolons (;). You can find the possible values on the Countries sheet.Example: LT;SE
Coupon language* . Specify the language used to fill out the Brief description and Additional terms fields. This helps publishers quickly find coupons in a language their audience understands.
You can find the possible values on the Coupon language sheet.Example: RU
Exclusive*. This mark indicates a coupon exclusive to Admitad Partner Network publishers.
Select a value from the list:- Yes, if the coupon is exclusive.
- No, if the coupon is not exclusive.
Personal promo code. This mark means that the promo code is a personal promo code, which means actions are attributed based on the promo code value assigned to a specific publisher, rather than UID.
- Yes means the promo code is a personal promo code.
- No means the promo code is a normal promo code.
Publisher usernames. If this column is completed, the coupon will be only available to the specified publishers.
This field is required if you are creating a personal promo code.
If you need to enter several values, separate them with a semicolon (;).
If left blank, the coupon will be available to all publishers.Example: publisher1;publisher2.
Promo code. Enter the promo code value.
This field is mandatory if Take&Go is set to Yes.Example: WINTER30
Format. Specify the coupon type: deal or promo code. .
- If the Promo code column is filled, specify promocode.
- If the Promo code column is empty, specify action.
Categories. Specify the category identifier.
You can find categories and their identifiers on the Categories sheet.
Special category. Leave this field empty.
Coupon types* — specify one of the values depending on the coupon type:
1 — Free delivery
2 — Order discount
3 — Gift for an order
Start date and End date. These fields define the coupon's validity period.
Format: DD:MM:YY HH:MM- If the coupon has an unlimited validity period, do not specify the end date.
- If the coupon is supposed to remain valid for a limited period, specify the end date.
- If the coupon should become active on a future date, specify the Start date.
If you don't specify the start date, the system will create the coupon with the date and time matching the moment of file upload in UTC+3.
If you specify a date but not a time, the system will automatically set the time to 00:00 UTC+3.Coupon start and end times are set according to UTC+3, regardless of your time zone. You cannot set a time earlier than the current UTC+3 time.
Example: You're in Astana, where it's 5 PM (UTC+6). The coupon should activate in 30 minutes, at 5:30 PM. Subtract the time difference from UTC+3 (i.e., 3 hours) and set the resulting time as the start time, in this case, 2:30 PM.
However, if it's currently 11:00 AM UTC+3, you cannot set a start time of 10:45 AM on the same date, regardless of your location.Expiry notification. Specify how many days in advance you’d like to receive a notification about the coupon's expiration. The notification will be sent to the email address in your account settings.
Format: Integer value.
Max value: 6.
Status*. Specify the coupon status:
- active: The coupon will become active immediately after file upload.
- inactive: The coupon won’t become active until you change its status.
Do not display as coming soon*. This option defines whether publishers will see coupon info before it becomes valid. Specify one of these values:
- Yes: The coupon will be hidden from publishers until it starts.
- No : The coupon will be visible to publishers immediately after file upload. This option is preferable. This way, publishers will learn about the upcoming deals and special offers in advance and will have enough time to design promos and the content plan and therefore will attract more customers.
Groups. If you want to make a coupon available only to a specific group of publishers, enter the group name in this column. To specify multiple groups, list them separated by semicolons (;).
Channels. If you want the coupon to be available to a specific publisher channel, specify the channel name in the column. To specify multiple channels, list them separated by semicolons (;).
3. After entering all coupon/deal data, delete the example row and save the file.
If you are not authorized to upload a file with coupons or deals, send the file to your account manager or contact support (follow these instructions).
Uploading the data file to the system
Maximum file size: 10 MB.
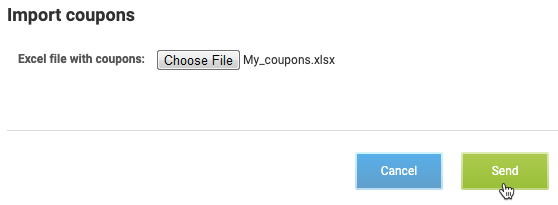
1. In the Coupons & deals section, click Import coupons.

2. In the import window, click Choose File and specify the path to the completed file with coupons and/or deals. Click Send.
3. The coupons and/or deals will be uploaded to the system and displayed:
- In your personal account under the list of coupons and discounts.
- In the publisher account under the discounts and coupons section from advertisers.
If the Start Date is later than the current date or the coupon status is "inactive," it won't be visible to publishers.
After uploading, you can edit the coupon in your personal account.
Possible upload errors
If you incorrectly filled in some fields while creating the coupons and discounts file, the system will report errors when uploading the file.

Fix the errors in the respective rows, then upload the file again.
-
Error message Description Currency (currency) does not exist. Correct the value in the Currency column. Only use the codes listed on the Currencies sheet. Enter a correct coupon validity period. Specify the Start Date and/or End Date in the format: DD:MM:YY HH:MM. The start date must be earlier than the end date. Correct the values in the Start Date and End Date columns. This field cannot be empty. /This field cannot be null. Enter the data in the row and column specified in the error message. Coupons cannot be launched backdated. Correct the value in the Start date column; it must be later than the current date. Specify the discount. Fill in the Discount column. Discount size cannot exceed 99%. Correct the value in the Discount column. Select a valid number of days for notification. The max number is 6. Correct the value in the Expiration notification column. There are no channels with ID={channel name} in this program, or they are inactive. Correct the value in the Channels column. There are no groups with ID={group name} in this program, or they are inactive. Correct the value in the Groups column. Promo code "promo code name" already exists. Correct the value in the Promo code column. One personal promo code must be assigned to one publisher. If yes is specified in the Personal column, the value in the Promo code column must be unique. Publishers with usernames {webmaster_logins} do not exist. Correct the username(s) in the Publishers column. Make sure the publisher is connected to the program. Invalid file name Correct the file name. Don't use special characters in the name. Cannot define file parameters. The file may have been damaged. Download the template again and complete it. Invalid form. Fix the errors below. The upload file must be in the XLSX or XLS format. File is too large: {file size}. Max file size: 10 MB. Check the file size. It must not exceed 10 MB. To reduce the file size, split the spreadsheet into several parts and upload each part in a separate file.
How to add coupons or promo codes through a manager
To do that, provide the manager with all the necessary details of the coupons that you need to add to your program. Provide information as a spreadsheet.
1. Download the file Coupon and deal upload template.xlsx and fill it out following this guide.
2. Send the file to your manager.
They will upload all the mentioned coupons to your programs and let you know when it's done.
3. Afterward, all uploaded coupons will appear in the Coupons & Deals section.
How to edit a coupon
If you are not authorized to edit coupons, ask your manager or the support desk (support@admitad.com) for help.
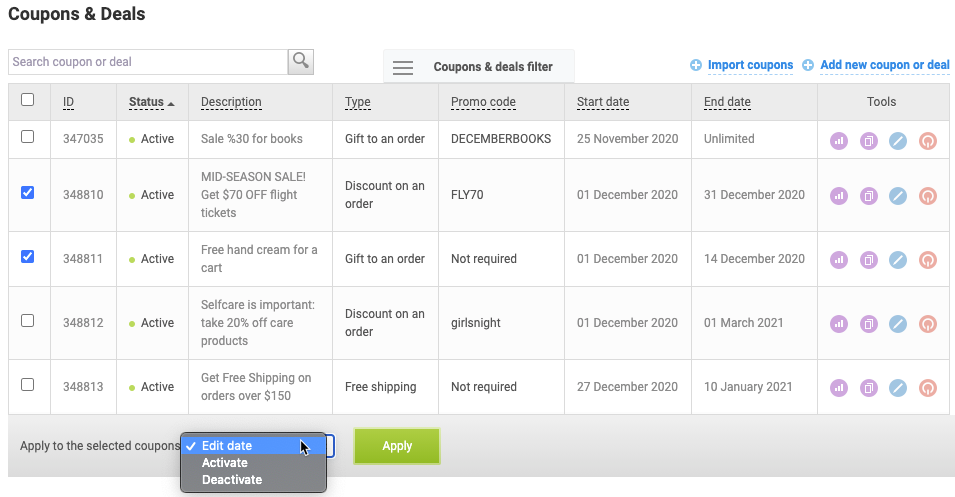
The Tools column offers the following actions:
- Reports. Opens the coupon's daily statistics for the current month. In the report filter, the coupon is featured as a banner. Learn more in Coupon performance analysis.
- Copy. Creates a coupon/deal copy and opens it, so the user can edit it. It may come in handy when you need to create copies for other languages or with other targeting settings.
- Edit.
- Deactivate/Activate.
You can perform some actions on multiple items simultaneously in the section. To do that, select them (by checking boxes) and choose the action in the Apply to the selected coupons field:
Coupons and iframe
In the publisher account, the coupons are displayed with 2 link options:
- In the first case, the link simply directs to the deal page.
- In the second case, the coupon header is displayed in an iframe at the top of the page.

If your website doesn't support iframe, or you don't want to use it, prohibit this type of coupon traffic. To do that, contact your manager. They will flag the corresponding box in General settings.
When iframe is prohibited, publishers will only have access to links directing to the deal page. Those links will automatically replace all the links with iframe already deployed in publishers' ad spaces.
Analyzing coupon performance
To see which added coupons were the most convertible, check the Reports on banners section ( Reports → On banners). Despite the name, this section contains data not only for banners but also for coupons and the default affiliate link.

In the statistics, you’ll see:
- Number of clicks for every coupon and eCPC (effective Cost per Click)
- Average conversion rate per coupon (CR)
- Actions performed after clicking the coupon.
The actions are grouped by status (on hold, confirmed, declined) and type (lead or sale). Every column contains the total amount of sales and leads with this status. For confirmed actions, you'll see the approval rate, which indicates the ratio of confirmed actions (leads and sales) to the total number of processed actions, both confirmed and declined. If there are no confirmed or declined actions, "—" will be in the column.
When comparing coupons, go by the number of confirmed actions and the related amount.
Features of working with personal promo codes
A personal promo code is a unique promo code assigned to a specific publisher.
Publishers can share such promo codes without using an affiliate link, since target actions performed with the personal promo code are tracked by the code word.
Currently, the setting allowing personal promo codes is enabled by default when integrating advertiser websites with Admitad.
However, if you are a long-standing partner of Admitad but have never provided publishers with personal promo codes, you might need to update integration settings to make sure your program will allow them.
To allow personal promo codes in your program, contact your manager or the support desk: support@admitad.com.