
Verification is the process of checking and processing data about target actions (for example, orders or registrations) that you received thanks to Admitad publishers.
Here are the benefits of verification:
- Data accuracy. Verification ensures that all actions are registered correctly and helps timely correct any discrepancies. This guarantees that you are paying only for real and high-quality results.
- Trust and loyalty of publishers. Transparency and accuracy in calculations increase the publishers' trust in your program. As a result, the program rating grows, and the number of partners interested in effectively promoting your business's products and services increases.
- Analysis and improvement of results. By comparing data, you can better understand which channels and partners bring the greatest benefits and optimize the program's operation.
Verification consists of 3 stages:
- Receiving data on actions recorded in Admitad reports: via file or automatically.
- Checking the received data: you compare Admitad data with the data in your system.
- Action processing: you provide Admitad with information on the action's final status (thus confirming or declining it).
Regular verification is a mandatory stage of your program's operation and a key element for ensuring its effectiveness.
There are 2 methods of verification:
- Manual verification — actions are processed manually in an XLSX file, and then the file needs to be uploaded to Admitad.
- You can follow our instructions to carry out verifications on your own, or ask your account manager for help.
- This method does not require the involvement of a technical specialist.
- Automatic verification (Auto-verification) — is configured once, and then the verifications occur automatically without your involvement.
- Assistance from your company's technical specialist will be required.
Manual Verification
Verifications should be conducted once a month or more frequently.
Manual verification consists of three stages:
- Generating a file with actions
- Processing actions in the file
- Uploading the completed file
If verification is performed by your account manager, you only need to process the provided file as described in the section Processing actions in the file and send it back to the manager.
Generating a file with actions
First, generate a file with information on target actions on hold. To do this:
- In your account, go to Finance → Actions on hold. You will be taken to the Action verification page.
- In the File generation tab, click Generate file.
If the Generate file button is inactive, it means there are no on-hold actions in your reports.
- Wait for the file to be generated, and then click Download in XLSX.
The file will contain all open actions for the entire duration of the program.
-
- Action time — time when the action occurred
- Admitad ID — action ID
- Order ID — order ID
- Publisher ID — publisher ID
- Order amount — order amount (field can be empty if the type of target action is Lead)
Note: The amount is shown in the original currency of the order. - Status — a status of the action in Admitad
- General expenses — general expenses
- Comment — afield for your comment (for example, you can specify the reason for declining the action)
- lost_order_invoice is the user's order number in your system. It will be indicated only if the publisher has sent a request to find this order or review its status. Editing the field is not necessary.
Processing actions in the file
Compare the data in the received file with the data in your system and edit the file: for each action in the Status field, specify the number corresponding to its current status.
0 — Open
1 — Confirmed
2 — Declined
If you specify any other value, the new action information will not be added when you upload the file.
If your system does not yet have information about the action's status — specify 0 in the Status field.
If the order is fully redeemed — specify 1 in the Status column to confirm the action.
If the order is partially redeemed:
- Specify "1" in the Status field.
- Change the order amount in the Order amount field.
Note: Do not change the currency, it must stay original. - Delete the data from the General expenses field.
- In the Comment field, leave a comment in the format Partial redemption with *original order amount*.
If you want to decline the action:
- Specify "2" in the Status field.
- Describe the reason in the Comment field.
-
- The publisher used a prohibited traffic source.
- The user did not pay, canceled, or returned the order.
- The publisher violated Admitad rules.
- The publisher violated the program rules.
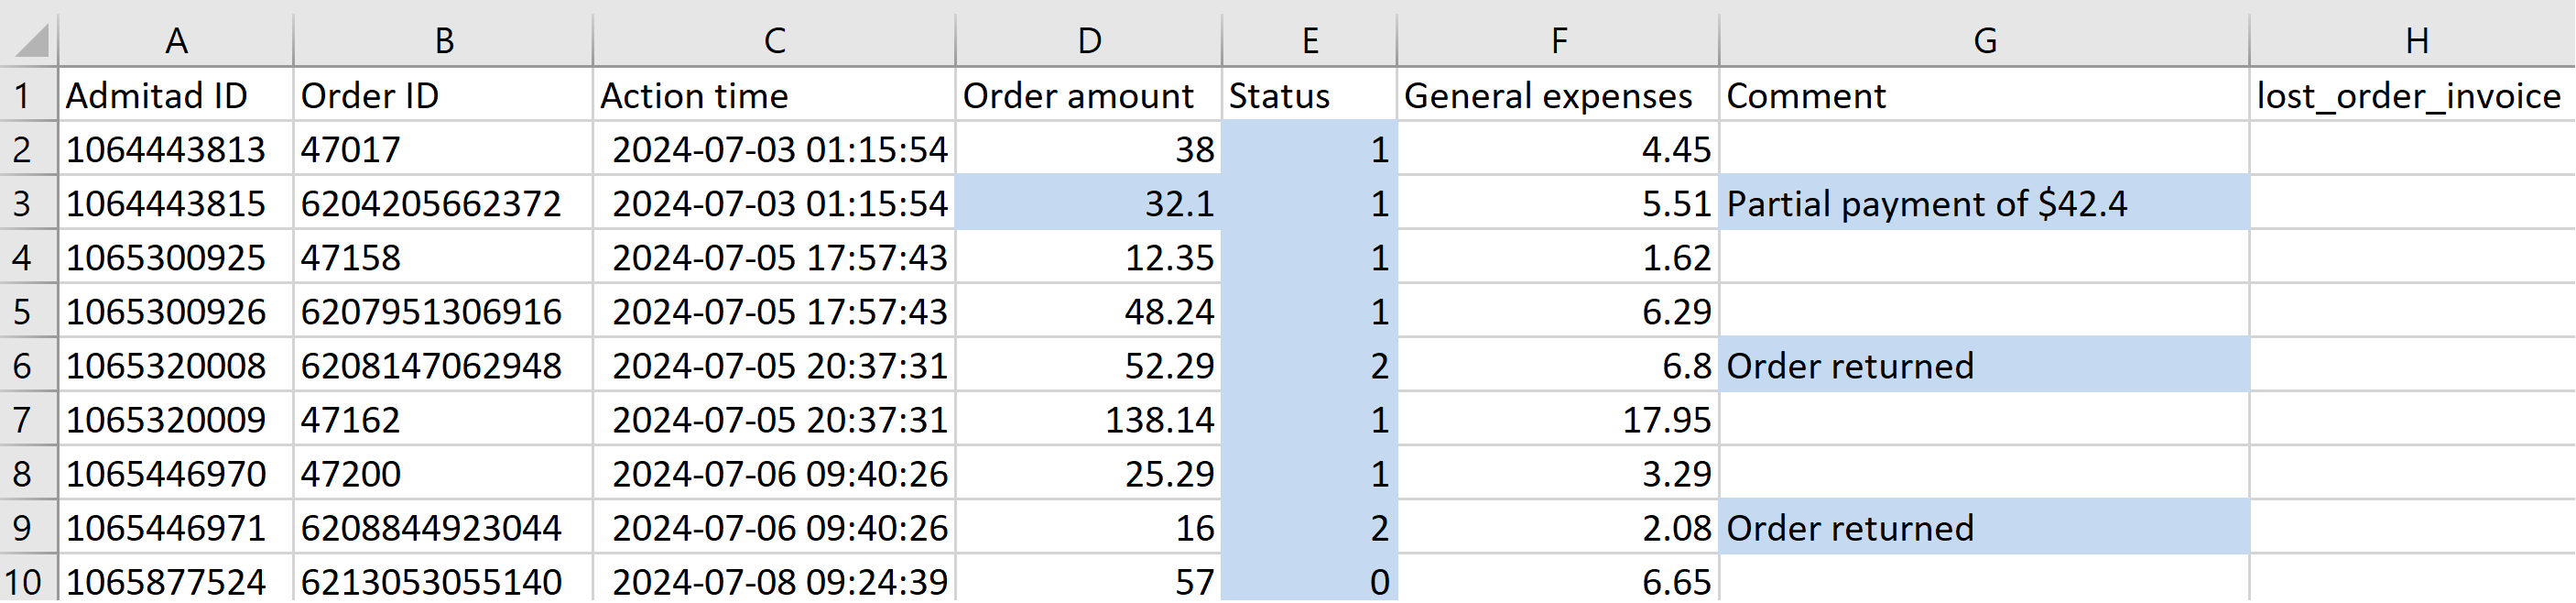
The screenshot shows an example of file processing, all changes are highlighted in blue. In this file:
- confirmed 7 actions, declined 2, and left 1 action open for which data is not yet available;
- for the confirmed order in line 3, the order amount was changed, a comment was added about it;
- for the declined actions, the reason for the decline was specified in the comments.
How to verify lost actions
If the action has a value specified in the lost_order_invoice field, it means that the publisher requested search of this order or review of its status. To verify such actions, specify values for them in the General expenses field.
Uploading the ready file
When the file is ready and all changes are saved in it, go to the File upload tab.
- Click Upload file and select the verification file. Its size must not exceed 5 MB.
- When the system checks the file, you’ll see how many actions are ready for processing (how many actions can be verified right now). You can run verification if at least one action is ready to be processed.
If not all the actions in the file are ready for verification, there are two options:- Amend the data in the file and re-upload the file. Launch the verification when all the action are ready to be processed.
- Launch the verification right away and fix remaining action later and send them in a separate file.
If you cannot find mistakes in the file to fix the data, contact support for help.
- Click Start verification. The process may take a few minutes. You can leave the page or close it.
When the verification is complete, you’ll be notified.
Automatic verification
Auto-verification helps save time and avoid errors that can occur during manual verification.
The auto-verification process looks like this:
- You create an XML file.
- Your system regularly (usually once a day) transfers information about actions from the database to this file.
- The Admitad server regularly accesses this file and uploads action data to Reports.
Read more about the XML file structure requirements and parameters in the article “Setting up auto-verification via XML”.
If you already have a suitable data file but with a different structure or parameter names, pass it to the tracking department so that auto-verification can be configured via a template or handler.
Another option is auto-verification via postback requests, where your server sends postback requests to the Admitad server with information about updated statuses and order amounts. This type of auto-verification is mainly used by financial programs.
Auto-verification requirements:
- Only the final order status needs to be passed in auto-verification. If the status can still change, it should not be transferred.
- Auto-verification should cover a long period.
It is necessary to check the status of open orders for the past year or more. - If the program allows partial order purchasing, such orders must be confirmed and the publisher's reward recalculated accordingly. In auto-verification via XML and postback, the reward is transferred in the parameter {reward}.
If you cannot transfer the publisher’s reward, you must notify the tracking department specialist. In this case, orders with partial purchase will need to be verified manually. In this case, orders with partial purchase will need to be verified manually.