
The personal account is the control center of your account that will be available after logging in.
Access to sections and tools, as well as the ability to change settings in your personal account, will depend on the type of program management.
Types of program management
Admitad Partner Network has 2 types of program management:
Through a personal account manager
In this case, you will be assigned a personal account manager who will take care of most of the program management and configuration according to your needs and the data you provide.
You can engage in certain processes if you want. For example, moderate publishers or get access to the management of other sections in agreement with the manager.
Independent management (with occasional involvement of an account manager)
In this case, you configure the program yourself and work with key sections and processes.
Specifically, you can:
- Fill out and update the data in the Program review section.
- Manage banners and landing pages.
- Manage coupons and promo codes.
- Edit, enable, and deactivate targeted actions in the program, but only if the program is inactive or in testing.
- Moderate affiliates and manage publishers already connected.
- Manage all channels and groups.
- Conduct verifications.
- Manage manual bonuses.
If you cannot edit certain settings or perform actions in any of the above sections, ask your account manager for access.
Personal account sections
Below, we've described the sections of the personal account, with links to detailed instructions on how to work with them.
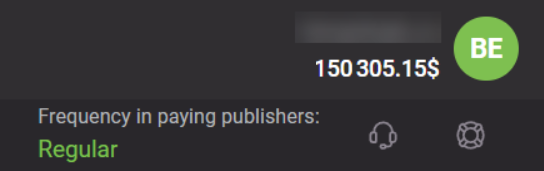
An account header is displayed on all pages of the advertiser account and includes:
Section with key information on the program
This section contains:
- Program name
- Program rating
- Your username
- Frequency of payments to publishers
- Program balance
- Manager's contact information

Program name
The name is stated in the middle of the header. It will match the name of your project (store, app, etc.).
The name may contain additional information for publishers:
- The tag of the region where the program operates: for instance, US for USA or WW for worldwide operation.
- The tag of the model the program employs: for instance, CPA for cost per action, etc.
Program rating

Your username
Your username is specified in the top-right corner.
When hovering over it, you'll see a drop-down menu that allows you to:
- Your balance details;
- Proceed to account settings (learn more below);
- Log out of your account.
Frequency of payments to publishers
This indicator reflects how often you pay publishers for target actions in your program.
What this indicator says depends on whether you pay invoices for payment according to the terms set out in the agreement.
The indicator may say:
- Regular, which means rewards are paid to publishers on time.
- With delays, which means payments to publishers are sometimes late.
- Infrequent, which means payouts to publishers are regularly delayed.
This indicator is also displayed to publishers in your program card in the Admitad Store and on the program page.
Publishers pay attention to this indicator when choosing a program to cooperate with. The better it is, the more eager publishers are to choose your program to work with.
Program balance
Your program's balance for confirmed and on-hold actions is displayed below your username.
It is calculated by the formula:
Program balance = account balance — sum of confirmed and on hold actions
Manager's contact information
When a program is created in the Admitad system, it gets an account manager. Their responsibilities and performed functions depend on the type of program management.
You can learn your account manager’s name and contacts by hovering over the icon 
Menu
The menu is placed in the middle of the header and contains the following pages:
Dashboard
The page consists of three blocks:
Brief Overview

The block Brief Overview contains 4 columns:
- Requests for cooperation — shows the number of requests from publishers sent since the program creation, and the number of requests you confirmed, declined, or still consider. Click on the last two fields to move on quickly to moderation or a list of declined requests.
- Expenses — shows the rewards of publishers for on hold and confirmed actions for the current day, the previous day, the last 7 and 30 days. Rewards are provided including Admitad fee.
- Actions — the number of confirmed and on-hold sales and leads for the current day, the previous day, the last 7 and 30 days. The line below indicates the hold time expiration date, i.e. up to what day these actions must be processed. Delays in processing are fraught with the discontent of your publishers and deterioration of the program rating.
- Data for yesterday — a number of impressions, clicks, and actions + an average conversion for the previous day.
Top-7
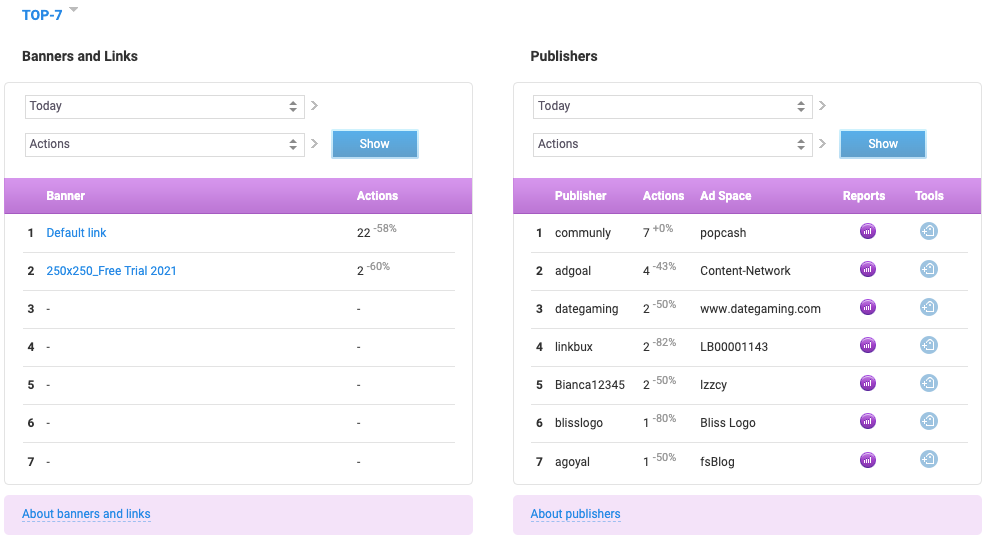
The Top 7 block appears after the program launch. It consists of two parts: Top 7 of banners and links and Top 7 of publishers.
Banners and links include banners, coupons, and Default link — affiliate links including those with a deeplink.
Top 7 of banners and links is made up of banners and links that have the greatest number of actions, clicks, and impressions for a certain period of time.
You can filter the ranking by periods or by the number of impressions, clicks, and actions selecting the required parameters in the line above the ranking. By default, Top-7 displays banners and links with the largest number of actions for the current day.
The ranking will help you to analyze the efficiency of the current ad creatives.
For example, if you see that small banners dominate the list, probably you should add more banners of small size. If Top-7 consists of coupons exclusively, focus on this type of ad creatives and keep the minimum set of banners.
When analyzing, focus mainly on Top 7 by actions as actions unlike clicks or impressions mean real benefit for the program for which you reward your publishers. So, even if an ad creative has a lot of clicks and impressions but no actions, it is not efficient and should be replaced.
The percent right to the number of actions, clicks, and impressions shows how much this indicator has changed as compared to the previous similar period.

Top 7 of publishers works in the same way, but it includes ad spaces of the publishers that showed the best results.
Note the data is recorded on ad spaces rather than by publishers, i.e. that one publisher can take several lines of the ranking if they have several joined ad spaces that showed the best results.
Click the icon in the Reports column to see reports on time filtered by this space and by the same period.
Chart

The chart shows the correlation of the number of impressions, clicks, and expenses for the last 16 days. It does not show actions.
To see the exact value of the curve for a certain day, hover over the curve point.
If you do not need one of the curves, turn it off by clicking its name in the legend.
Program
- Program profile
- General settings — define the principles of the program functioning in the Admitad system.
- Program information — here you can upload the logo and provide the description of the program that will be displayed in Admitad Store and on the program page.
- Rules — here, you can specify special terms for traffic sources, usage of banners and links, clarify rate terms, indicate restrictions, etc.
- Traffic settings
- Traffic sources — decide what sources can be used by publishers to attract traffic to your website.
- Actions and rewards — define what actions you need from users and how much you are ready to pay for them to the publishers.
- Logo and documents — upload the logo in the vector format, letters of guarantee, licenses, and other documents that will be useful for the publishers.
- Integration
- Integration — learn available integration methods and get the required data.
- Integration test — make sure that your tracking requests are sent to Admitad and contain no errors.
Publishers
- My publishers
- Connected — a list of publishers that joined your program. Here you can find more information on how to develop your cooperation with them.
- Waiting — a list of publishers that requested to join your program and now are pending consideration.
- Declined — publishers whose requests were declined. Note that even if you or an account manager declined a request, you can bring it back to moderation or even confirm them if necessary.
- Select publishers
- Referral link — users, who have registered in Admitad after clicking through this link, become your referrals, and you won't have to pay fees from their earnings.
- Top 100 publishers — 100 publishers with the greatest number of clicks, impressions, or actions for the selected period.
- Promotion
- Bonus programs — the section for creating bonus programs in your affiliate program for attracting publishers. To set up a bonus program, contact your account manager.
- One-time bonuses — use one-time bonuses to reward publishers.
- Bonuses for goods — set an extra reward for selling certain products.
- Channels — by adding publishers to channels, you get an opportunity to set special rates for them and provide exclusive coupons and banners.
- Groups — groups are almost the same as channels but with no opportunity to set special rates + a special group where all your referrals are gathered together.
Advertising tools
- Coupons and promo codes
- Coupons — add and manage coupons and promo codes.
- Promo code requests — check requests for promo codes to accept or decline them.
- Creatives
- Banners — manage banners availiable to your publishers.
- Landing pages — allow publishers to drive traffic to specific pages.
- Banner categories — define banner categories so publishers can find them by certain creteria.
- ReTag — add a special container to the pages of your website to make integration with publishers easier.
- Extra reward
- Bonus programs — the section for creating bonus programs in your affiliate program for attracting publishers. To set up a bonus program, contact your account manager.
- One-time bonuses — use one-time bonuses to reward publishers.
- Marketplace X — order advertising directly from popular influencers.
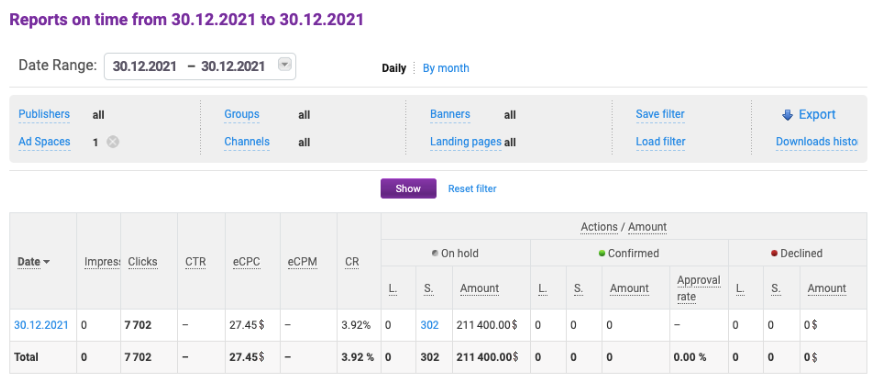
Reports
Different types of statistics will help you to analyze the performance of your program, evaluate the effectiveness of ad creatives or the work of publishers.
More information about reports on publishers, on ad spaces, and on actions can be found in Working with joined publishers.
For reports on groups and channels, read in Groups and Channels, respectively.
To learn about reports on banners, coupons, and landings, go here and here.
Payments
- Verification
- Actions on hold — export actions awaiting your review.
- Exports — download ready verifications or action reports.
- Upload actions for verification — upload verified actions back to the system to apply new statuses to them.
- Confirmed actions — generate a report on confirmed actions to create an invoice based on it.
- Lost orders — review publishers' lost orders appeals.
- Invoices
- Financial history — issue invoices and track affiliate program expenses.
- Replenishment history — information on your payments in Admitad.
Account settings
To go to account settings, hover the cursor over your username in the right-hand corner and choose the required section from the Settings block.
- Account settings
- Onboarding
- Company info
- Company documents — all your company's documetns added to the system will be shown.
- Payment details — all payment details added to the system will be shown.
- Email notifications
- Pricing
- API and apps
Account settings
In this section, you can add or edit your contact details and general settings or go to your Mitgo ID account (an all-in-one Admitad account) to edit your details and security settings.
- Username is your Admitad Partner Network username. You can find the signup date on your right.
- Email is the primary email address that you provided during signup.
- To change your primary email address, click Edit.
- The Security section in Mitgo ID will open. You can change your email address here by following these steps.
- Name is your full name.
- To change these details, click Edit.
- On the My Details page that will open in Mitgo ID, you can change your name by following these steps.
- Mobile phone — the phone number for restoring access to your account.
- To change your number, click Edit.
- The Security section in Mitgo ID will open. You can change your mobile phone number here by following these steps.
- Company name is your company's name.
- To add or edit the company name, click Edit, specify the name of your company, enter your account password, and save the changes.
- Date of birth is your date of birth.
- To change your date of birth, click Edit.
- On the opened My Details page in Mitgo ID, you can change your date of birth by following these steps.
- Password is the password you use to log in to your account.
- To change your password, click Edit.
- The Security section in Mitgo ID will open. You can change your password here by following these steps.
- Default language is the language of your account interface.
- To change your language settings, click Edit, select your language from the dropdown list, and save the changes.
- Email for publishers is the email address that will be shown on your program's page in Admitad Store.
Only trusted publishers will see it and use it to get in touch with you, negotiate a promotion, or discuss another form of cooperation.- To add or edit the email for publishers, click Edit, enter the email address, and save the changes.
Onboarding
If you don't see the Onboarding section in your account, it means it's unavailable in your region or that you have selected a plan that includes personal manager service.
This section shows the affiliate program setup steps that you need to complete to start an affiliate program. You can complete these steps in any order.
Once you complete all the steps, click Submit for approval. Admitad specialists will verify your affiliate program's info and:
- If everything is okay, the program will be launched
- If settings contain errors, Admitad managers will contact you and explain what needs to be fixed
Company info
In this section, you specify your company's official information, including the country, city, address, and postal code associated with your company, as well as the full name of the official representative (usually a manager).
To edit or add information:
1. Click Edit in the appropriate line.
2. Enter information in the field.
3. Enter your account's password in the appropriate field. Save the changes.
Email notifications
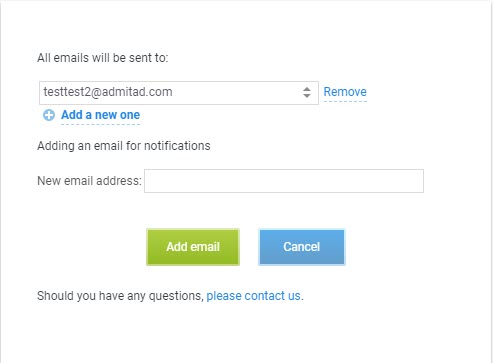
In the Email notifications section, you can:
- Add an email address for email notifications
- Set up the list of email notifications that will be sent to this email address
- Delete an email address for notifications
-
1. In the box on the right side, click Add a new one.
2. In the New email field, enter the email address to which you want notifications to be sent.
3. Click Add email.
4. A confirmation message will be sent to the specified email address.Go to the message and click Confirm email.
If you haven't received any confirmation email, please refresh the page, select your email address from the list, and click Request confirmation.
Done! You have added a new email address for notifications.
You can add several email addresses in the same way.
After that, you can customize the list of notifications that will be sent to this email address.
To delete the email address for notifications, choose the email address from the dropdown list in the right-hand box, then click Delete.
-
You can configure notifications only for the confirmed email address.
1. In the box on the right side, select from the dropdown list the email address for which you would like to configure your email notification preferences.
2. On your left, in the Email notifications area, flag the notifications you want to be sent to this email address.
3. Click Save changes in the box on the right.
Done! You have successfully configured your email notification preferences for the email address you have provided.
Notification settings tips
- Be sure to enable the following notifications:
- Coupon expiration
- Processing time ending
- Account deposits
These notifications are crucial because the timely processing of actions and depositing funds, as well as keeping your promotions up-to-date, are the factors that drive your program's performance.
- Subscribe to weekly and/or monthly reports on the program and best publishers. Newsletters will be sent to the email address specified in this section.
- Be sure to enable the following notifications:
Pricing
If you don't see the Pricing section in your account, it means it's unavailable in your region.
This section shows the plans under which you will cooperate with Admitad.
You can:
- View all options available for each plan.
- Choose a plan (Rise or Peak). The plan will be activated right after the payment.
If you chose the Peak plan and requested its demo, our specialists will contact you to show you a demo. If you agree to the terms, a personal manager will be assigned to you. They will start and manage your affiliate program.
Learn more about choosing and changing your plan
API and apps
This API and apps section (account icon → Account settings → API and apps) contains the API credentials and the list of apps that you have granted access to your Admitad account. For more information about the API and how to use it, refer to the Admitad API documentation.