Note! For the self-employed persons, the standard withdrawal of funds to a bank card is again available. The withdrawal to a bank account was a temporary solution, so it no longer works. Please create withdrawal requests only according to the instructions below.
Money can be withdrawn to a bank card by citizens of the Russian Federation who are registered with the Federal Tax Service as self-employed. You can register:
- in the My Taxes app;
- via your taxpayer account on the official website (see Federal Law on the Self-Employed).
The bank card must be issued in Russia, the account must be ruble-denominated.
Specifics
| Withdrawal currency | Only RUB | |
| Minimum, one-time withdrawal amount | 1 000 RUB | |
| Maximum, one-time withdrawal amount | 150 000 RUB | These limits only apply to a specific bank card. If the limit is depleted for the card, you can add another one to Wallet and use it for withdrawals |
| Maximum monthly withdrawal amount | 500 000 RUB | |
| Maximum annually withdrawal amount | 2 400 000 RUB | Once you reach this limit, you will not be able to withdraw funds using this method, and any further withdrawal requests will be rejected |
| Available payment types |
Standard
Express |
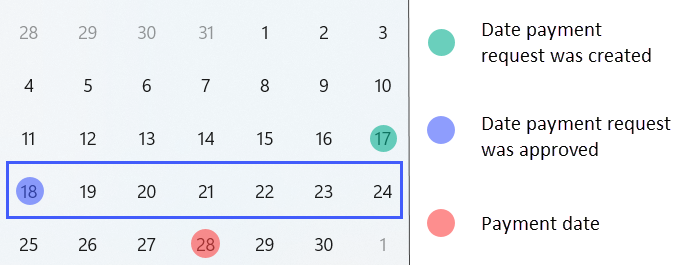
The payment is usually made on Thursday a week after the request is approved
The payment is made within 24 hours |
Step 1. Add tax information
The step is relevant if you haven't already add tax information that shows your self-employed status.
1. Go to Tax Information.
2. Click Add tax information.
3. Fill out the following fields in the tax information form:
- Name — enter any short name of your tax information, which will only be displayed in your account. If you add any other tax information in the future, you will be able to distinguish them by name.
- Subject of law — select Self-employed.
- Country — select Russia.
- City, address, ZIP code — enter your residential address or registered address.
- First name, Last name — enter your first name and last name. They must match the one you entered when registering in your taxpayer account (on the website or in the app).
- TIN — enter your taxpayer identification number. It must match the tax number in your taxpayer account.
4. Once you've filled out all the required fields, click Add tax information.
This tax information will now have the Verifying status. We will verify it in 1-2 business days.
- If your information is successfully verified, your tax details be marked as Confirmed. After that, you can move on to adding payment details.
- If your information cannot be verified, your tax details will be given the Editing required status. In this case, edit your tax details. After that, your tax details will be resubmitted for verification.
Step 2. Add billing details
1. Go to Billing details.
2. Click Add billing details.
3. Choose the tax information that you added in step 1, then click Next.
4. On the New billing method page, fill out the following fields:
- Name — This can be anything, but it's better to enter a simple name that's easy to understand. For example, “Bank card RUB”. This name will later help you easily find your billing details in the list when creating a request.
- Payment method — choose Bank card (self-employed).
- Account currency — choose RUB.
- Card number — enter your card number. It must be issued in Russia.
- Phone number — enter your actual phone number, used in the My Taxes app.
5. Click Add billing details.
6. Verify the billing details you added. We recommend using two-factor authentication.
If you haven't enabled two-factor authentication, you can verify your billing details via email. To do so, click Verify, then Send verification code. Enter the code you received.
Bank card verification is carried out by a third-party service and usually doesn't take much time.
If the verification is not completed within a day, contact Admitad support.
Done! You've added billing details.
If the tax details you selected when adding your billing details:
- have already been verified, the billing details will be marked as Active, meaning you can use this method to withdraw funds from Wallet;
- haven't yet been verified, then the billing details will have the Tax Information verifying status until we finish verification.
Step 3. Connect the partner Jump.Работа
Please note that to connect to the partner, you do not need to download the partner's app or go to their website.
The step is relevant if you're using this payment method for withdrawal for the first time.
When you use the "Bank card (self-employed)" payment method, you need to pass payment information to the Federal Tax Service. To do this, you need to connect the partner Jump.Работа once. Later on, every time you request a payment, information will be submitted to the tax authorities automatically.
You can connect the partner:
How to connect the partner in the "My taxes" app
- Open My Taxes.
- Wait for the notification that connecting a partner is possible.
- Go to the Other section at the bottom of the screen.
- After that, go to Partners and find Jump.Работа on the list.
- Click the Connection request next to Jump.Работа.
- Click Allow to connect the partner.
The connection request usually becomes available within 2 hours after creating or updating billing details in the Earnings account from Step 2. During this period, the partner checks the specified data. In rare cases, it may take up to one day.
Done! The partner is connected. From now on, all billing details will be passed to the Federal Tax Service automatically.
How to connect the partner on the Federal Tax Service website
- After creating a withdrawal request, go to the the Federal Tax Service website and log in to your taxpayer account.
- Go to Messages.
- Find the following request in the notifications: "Jump.Работа requests permission to perform certain actions on your behalf."
- Click the three-dot icon, then Allow.
Done! The partner is connected. From now on, all billing details will be passed to the Federal Tax Service automatically.
Note! We will be able to confirm the withdrawal request only if you successfully connect the partner.
After you confirm the connection of the partner, tax office must accept its invitation. At this time, your details will have the "Awaiting confirmation from the tax office" status.
While the details are in this status, a payment cannot be made. When the invitation is accepted, the status will change to "Requires verification", and you'll have to verify your details via 2fa. After that, you will be able to use them for money withdrawal.
Step 4. Create a withdrawal request
- Go to Withdrawals.
- In the Withdraw from field select your RUB wallet, in the Withdraw to field select the billing details added in step 2.
- Specify the amount you want to withdraw, but not less than 1000 RUB and not more than 150 000 RUB.
- Click Withdraw funds.
Done! You've created a withdrawal request. The payment is usually made on Thursday a week after the request is approved. Approval usually takes 1 to 3 business days.