
To set the remuneration amount that you'll pay publishers under your program, you must add actions and rates to it.
A target action or action is the action you want to get from a user: placing an order, filling out a request, registering on the website, installing an app, etc. You pay a reward to the publisher who brought the users to the website and the actions performed by them.
A rate is the remuneration you're willing to pay for a target action. By using rates, you motivate publishers to attract users to your website, who, in turn, perform the action you need them to on the website. The amount of remuneration at the rate is called the reward.
Every time you add a new action and/or rate to the program, you must add information about this action to your website in the Admitad system by performing integration. Learn more
To learn more about actions and rates, see the article Actions and rates: the concept and types.
The procedure for creating and managing actions and rates
The procedure and specifics of configuring a rate grid depend on the type of program management.
Management via an account manager
How to create actions and rates
To add actions and rates to your program:
1. Inform your manager:
- Which actions you require (select from the list of standard actions or offer your own)
- Whether it's necessary to create exclusive actions for channels and divide the actions:
- By current and new users
- By the ability to use or not use a coupon when placing an order
- By regions, product categories, and order amounts.
- What rewards should be set for all actions and rates
- What the hold time will be, meaning the period when you'll approve or decline every action from the time it was performed. The standard hold time is 45 days, and the maximum is 60 days.
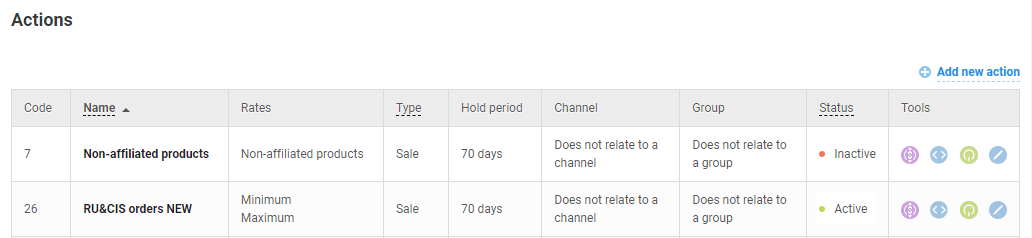
2. After the manager adds actions and rates, you'll see information about them in your account under the Actions section (Program → Traffic settings → Actions and rewards).
To check what remuneration is set for each rate, click the 
Created actions can't be deleted, but they can be deactivated. To deactivate an action, contact your account manager.
How to change actions and rates
To change or create a new action or rate, contact your manager.
- If creating or changing a rate will reduce the reward for publishers already working with the program, they should be informed of it at least 5 days before the change. To do so, inform the account manager about the planned change in advance.
- The publishers and manager only need to be notified of the increase in remuneration 1 day before the change.
Independent management
If you don't have an account manager, create and configure actions and rates of the program independently.
- How to add an action and configure a rate to launch a program
- How to manage created actions and rates
If you want the actions and rates of the program to be configured by your personal manager, switch to the Peak rate. Learn more
How to add an action and configure a rate to launch the program
To prepare the affiliate program for launch, add an action and configure a rate.
Also, there's a limit on number of active actions that you can create within your rate plan:
| Rise | 3 |
| Peak | Unlimited |
If you need more actions, upgrade your plan.
This limit is only relevant for affiliate programs that operate under a rate plan. It doesn't affect other programs.
How to add an action
1. In your account, go to Program → Actions and rewards and click Add action in the upper right-hand corner.
2. Fill out the action information:
- Name. Specify a short and clear name of the action, for example, Paid order or Purchase of the annual subscription. Under this name, the action will be displayed for publishers in the Admitad Store catalog.
- Channel. If you want only specific publishers to see this action and be able to receive remuneration for it, select the channel that contains those publishers. If you leave the field empty, the action will be available to all publishers.
- Type. Select the type of target action from the drop-down list:
- Lead. Registration or filling out a request
- Sale. An order or purchase on a website
- Consider the cookie lifetime. The check in the box is set by default. Please don't remove it.
This setting means that after following the affiliate link, the user will be linked to the publisher that placed it. If a user performs a target action in the cookie lifetime period, then the publisher to whom the link belongs will receive remuneration. - Hold time. Specify the time period to process the registered actions. The standard hold time is 45 days, and the maximum is 60 days.
- Status. Select the Active status.
While the action is inactive, the affiliate program integration can't be tested because the action won't be registered in the program reports. - Reward. Specify the reward amount and type.
-
- Fixed. Publishers will receive a fixed amount regardless of the order amount.
- Percentage. Publishers will receive a percentage of the order amount.
The specified reward will be set as the default rate for this action. After creating an action, you can edit this rate (see instructions) and/or add other rates to the action (see instructions).
3. Click Create.
Done!
You've created an action to launch your affiliate program. Now you need to configure the rate for this action.
How to configure the rate
To learn more about rates and their types, see this article.
1. In the line of the created action, in the Tools column, click 
2. To the right of the Rates block, click Edit next to the rate created by default when adding the action.
Fill out the following fields in the form that opens:
- Name. Enter a clear rate name (for example, Tablets and smartphones).
The name has to be unique. Make sure it doesn't duplicate the previously added ones. If you see an error when saving a rate, try to change its name. - Code. This field will be filled out automatically. Its value is a code assigned to your rate. You'll need it when integrating your website with the Admitad system.
- Status. Select the Active status.
If the rate is inactive, your website integration with Admitad can't be tested because the action that belongs to the rate in the Inactive status won't be registered in the Admitad system or the program reports. - Rate rewards. The following settings are available in this block:
- To specify the reward amount, click the symbol and enter the required value.
- To select the reward type, click the % symbol (a percentage of the order amount) or the currency symbol (a fixed amount).
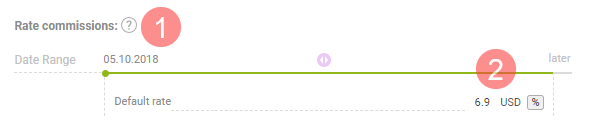
- Period. (1) The date when the rate goes into effect. The current date is displayed by default. To change the value, click the date and select the required day.
- Default reward. (2) The amount and type of the reward.
You can set additional rate settings for the reward to change depending on the region or amount of ordered items. To learn more about how to change the rate rewards, see this section.
3. Click Save all changes.
Done! You've added an action and configured the rate for your affiliate program.
Next, you need to configure tracking of the created actions on your website and sending data about them to Admitad. Otherwise, you won't be able to launch your affiliate program. Learn more
How to manage created actions and rates
Before changing the already added actions and rates, learn about the specifics of managing them.
The specifics of managing actions and rates
- You can change the settings of target actions and rates and deactivate them if your program is inactive or undergoing testing. Learn more
If the program is already launched, contact the support desk (support@admitad.com) or the account manager.
Created actions can't be deleted. This is due to the technical features of the system. - If changing the rate will decrease the reward for publishers already working with the program; they must be informed of this at least 5 days before the change. To do so, inform the support desk (support@admitad.com) or your account manager about the planned change in advance.
- The publishers and manager only need to be notified of the increase in remuneration 1 day before the change.
How to manage actions
To add a new action, follow these instructions.
Go to Program → Actions and rewards and find the required action. Actions in the table are listed in alphabetical order.
You can perform the below-mentioned operations by clicking the respective button in the Tools column.
- To check the remuneration amount set for a rate, click
- To receive a code to track actions on your website, click
.
This method of receiving a tracking code is outdated. It's recommended to receive a code in the Integration section. Learn more - To deactivate an action, click
.
In this case, the action will stop working. It'll have the Inactive status and will no longer be displayed to the publishers. - To activate an action, click
.
In this case, the action will resume working. It'll have the Active status and will be displayed to publishers in the Rates block (in the card and on the program page). - To edit an action, click
You can:- Change the action name
- Select the channel or group for which an action is used (if the channel and/or group aren't specified, the action will work for all publishers)
- Change the hold time
- Change the action status to active or inactive
- Change rates for actions. Learn more
How to configure a complex rate
To learn how to configure a standard rate, see this section.
Below is a description of how to configure complex rates when the reward depends on the following:
Such settings can be used separately or combined.
Settings can be configured as separate rates or as parameters within one rate. If this is your first affiliate program, we recommend configuring separate rates. Learn more about different types of rates
Division of rates by region
This setting is available only if geotargeting is turned on for your program.
To configure a change of reward for the rate depending on the user's region:
1. Go to Program → Actions and rewards and find the required action (in the table, actions are listed in alphabetical order).
2. In the Rates block, click:
- Edit next to the required rate if you have to configure an existing rate
- Add a rate if you have to create a new rate.
3. Click 
4. In the new window, specify the country or city for which you want to add the reward, and click Save.
- You can add several regions at once
- To delete a region, click
next to it.
5. Specify the amounts and types of rewards valid for each region.
6. Click Save changes.
-
You want to set different rewards for users from Germany and Belarus. To do so, add each country and specify the required rewards for them.
Now, beginning with the specified date, the amount of the publishers' remuneration will depend on the region where the user performed the target action.

Division of rates by the amount of ordered items
If you recalculate the order amount (in case of a partial buyout) but don't pass the new publisher's remuneration, it won't be recalculated automatically and will remain the same.
If you want the reward to change depending on the amount of ordered items, do the following:
1. Go to Program → Actions and rewards and find the required action (in the table, actions are listed in alphabetical order).
2. In the Rates block, click:
- Edit next to the required rate if you have to configure an existing rate
- Add a rate if you have to create a new rate.
3. In the form that opens, click 
4. In the new window, click 
- If necessary, you can add several amounts for which different rewards will apply.
- To delete the division by amount, click
above it.
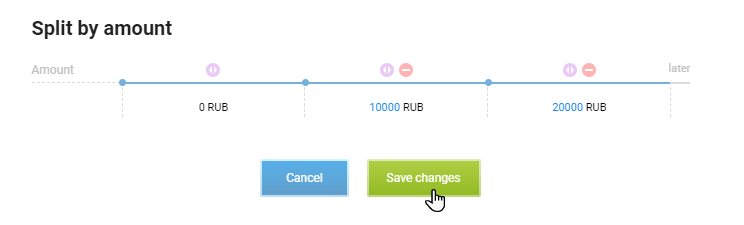
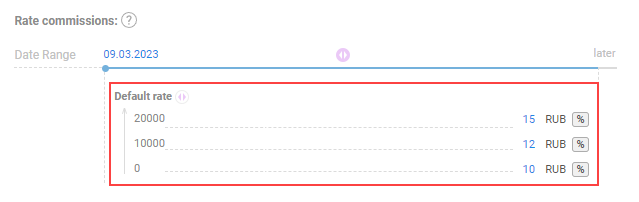
5. Specify the amount and type of reward for each order amount.
6. Click Save changes.
Example (expand)
-
You want to set an increased reward if the amount of ordered items exceeds ₽10,000 and ₽20,000. To do so, add a division by these amounts and the reward amount that will apply if the condition is met.
Now, beginning with the specified date, the amount of the publishers' remuneration will depend on the amount of ordered items.
FAQ
How to change a rate rewards
If the program is already launched, you can't change the size and/or type of reward independently. Contact the support desk at support@admitad.com or your account manager.
If the program isn't launched yet, to change the rate rewards, select the rate start date and set a new reward amount.
1. Go to Program → Actions and rewards and find the required action (in the table, actions are listed in alphabetical order).
2. Click Edit in the Rates block next to the required rate.
3. Click
A point will appear on the line, dividing it into two periods.
4. To the right of the dividing point, click 
To delete a period, click
5. Specify the amounts and types of rewards that should be in effect for each period.
6. Click Save changes. Done! You've changed the rate rewards for the action.