If your ad space is a
- social network,
- website,
- web service,
you will have to verify it's you who owns the ad space after you add it.
This will ensure that you're the only one who can use the space to earn money.
The usability of the ad space will be limited until you confirm that you're the owner. You won't be able to join programs or get affiliate links.
Once you add an ad space of any of the above types, you will be taken to the verification page.
If you missed this step, you can get back to it later. How to go to the ad space ownership verification page
How to verify ownership of a "Social network" ad space
On the ad space ownership verification page, do the following:
1. Click Verify.
2. If you haven't logged in to the social media account you want to add as an ad space, do it in the new window.
If you have logged in to an account different from that you added as an ad space, you won't be able to verify ownership.
In this case, log in from that account and log in to the account you added as an ad space. Learn more about verification problems
3. In the new window, grant Admitad access to your social media account.
Ready! If you have done everything right, ownership will be verified and ad space status will change to Active.
After that, you will be able to:
How to verify ownership of a "Website/Web service" ad space
On the verification page, select one of the following options:
Deploying a meta tag between homepage tags
1. Copy the meta tag from Meta tag deployment.
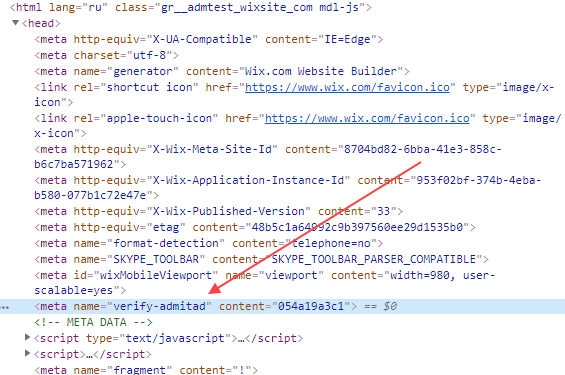
2. Insert the meta tag between tags <head> and </head> of your website's homepage.
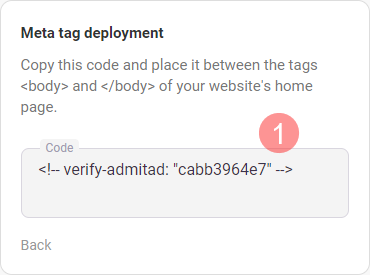
If you can't insert the meta tag between tags <head> and </head>, click Can't place the tag into <head>?.
Copy the code from the new field (1) and insert it between tags <body> and </body> of the homepage.
3. Click Done! You can check it now on the verification page.
What to do if you face any problems during verification
Ready! If you have done everything right, ownership will be verified and ad space status will change to Active.
After that, you will be able to:
Adding a check file to the DNS entry
Adding a TXT entry will not affect your website operation or DNS settings.
1. Copy the TXT entry from Adding a DNS entry.
2. Log in to your account on the domain name registrar website. How to identify your registrar
3. Open the DNS entry page. It may have any of the following names:
- DNS Management
- Name Server Management
- Control Panel
- Advanced Settings
4. Add the check entry.
- Entry type: TXT.
- Value/Answer/Destination: Insert the copied TXT entry.
Leave other fields empty or Default.
5. Save the changes.
Syncing data about the new TXT entry make take from a few minutes to a few days.
5. Click Done! You can check it now on the verification page.
What to do if you face any problems during verification
Ready! If you have done everything right, ownership will be verified and ad space status will change to Active.
After that, you will be able to:
Uploading a file to the site's root directory
1. Click Download file in Uploading the file to the root directory.
2. Upload the file you've downloaded to your site's root directory.
3. Click Done! You can check it now on the verification page.
What to do if you face any problems during verification
Ready! If you have done everything right, ownership will be verified and ad space status will change to Active.
After that, you will be able to:
Possible problems with verification
Below, we describe all the possible problems you may face during verifications, and respective ways to resolve them.
- Typo in the ad space link
- Typo in the meta tag, code, or TXT entry
- You haven't granted Admitad access to your social media account
- Social media account you logged in to differs from that you added as an ad space
- Meta tag, code, or file deployed in the wrong place
- File name or content was changed before upload
If your problem is not on the list or nothing helped, please contact Admitad support.
Typo in the ad space link
Go to Ad spaces and make sure the link to the ad space you have added has no typos or mistakes.
If the link is wrong, edit it:
1. Click Edit in Settings.
2. Specify the correct link in the Resource link, then click Done.
3. Go back to the verification page. For that, click Inactive in the Status column and try to confirm ad space ownership again.
Typo in the meta tag, code, or TXT entry
Check if the value of the meta tag, code, or TXT entry you have deployed in your ad space fully matches the value on the verification page.
The value must be copied and pasted in full and contain no unnecessary characters or spaces.
After you have checked everything, try verifying ownership again. How to go to the ownership verification page
You haven't granted Admitad access to your social media account
You can't verify that you own an ad space unless you grant Admitad access to your account.
This access is necessary for you to verify that you own this social media account.
If you haven't granted access by mistake, try verifying ownership again and click Allow at the access granting step. How to go to the ownership verification page
Social media account you logged in to differs from that you added as an ad space
Before verifying ownership, open a new page and log in to the account you have added as an ad space.
If you want to verify ownership of a social media community, make sure you have logged in to the account that manages this community.
After you have checked everything, try verifying ownership again. How to go to the ownership verification page
Meta tag, code, or file deployed in the wrong place
Get back to the corresponding guide and make sure the following steps are complete:
- The meta tag or code are added to the homepage and inserted between the right tags.
- The file is added to the root directory
After you have checked everything, try verifying ownership again. How to go to the ownership verification page
File name or content was changed before upload
In this case,
1. In the root directory of your website, find and delete the file you have uploaded earlier.
2. Go back to the verification page (how to do that) and go through the process again:
- download the file
- keeping the file name and content unchanged, upload it to the root directory
After you have checked everything, try verifying ownership again.
FAQ
- How do I go back and confirm my ownership of an ad space if I skipped this stage when adding it?
- How do I deploy a meta tag or code if the ad space was created using a free website builder?
How do I go back and confirm my ownership of an ad space if I skipped this stage when adding it?
To go back and confirm your ownership of an ad space, go to Settings, open the Ad space tab, find your ad space, and click on its status (Inactive).
You will be taken to the page where you will be able to confirm ownership of that ad space.
How do I deploy a meta tag or code if the ad space was created using a free website builder?
If you used a free website builder, consult the builder's <head> help center to find out how to insert a code or meta tag.


