
Integration is a process during which you configure sending information about target actions performed on your website to the Admitad system.
A target action is a purchase, registration, completed application form, or other expected action performed by a user whom an Admitad publisher led to your website.
General information: specifics and recommendations
- You can only initiate integration if the following is done for your program:
- A tracking link is already generated in General Settings.
- A target action is added, and a related rate is set up in Actions.
If you don't have a manager, you need to generate a tracking link on your own (see this guide) and add at least one action and at least one rate (see this guide).
If you have a personal manager, they will do this for you.
- Integration is a mandatory step to continuing your work and starting an affiliate program with Admitad.
- To accelerate integration, you might want to involve your specialist and delegate this process to them, providing them with these instructions.
Once integration is complete, all target action details (date, order ID, order amount, etc.) will be sent to Admitad automatically.
How integration via Google Analytics API works
Google Analytics API (GA API) is a programming interface of Google Analytics that makes it possible to use Google Analytics data and functions through HTTP requests.
How it works
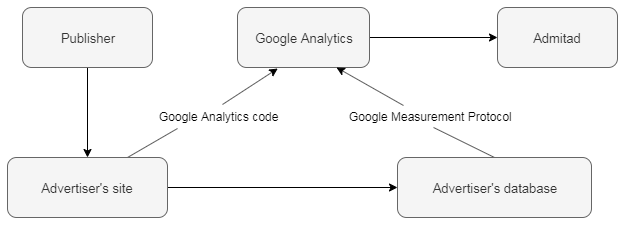
1. Google Analytics collects user activity data using the "counter" (JavaScript code) deployed on the pages of a website.
Once a user performs a target action, the code is executed and registers information about the action. After that, it sends data packets to Google Analytics.
2. Admitad Partner Network sends a GET request to Google Analytics API and gets the order number, order amount, and other target action data.
3. Admitad uploads this data, and the information appears in the Reports section of the Admitad account.
Remember that the Google Analytics counter is vulnerable to ad-blocking and other extensions. Admitad does not provide technical support for Google Analytics, nor does it bear liability for any programs that may have suffered as a result of using Google Analytics to collect target-action data.
This is why we recommend that you use standard integration via a tracking code or other available integration methods. Read more
Setting up integration via Google Analytics API
To integrate a website using Google Analytics API, follow these steps (you can find a description of each one below):
-
Set up eCommerce tracking in Google Analytics.
-
In Google Analytics, grant your Admitad manager access to orders attributed to Admitad.
-
Set up integration parameters in Google Analytics and
deploy the code fragment with the required parameter values on your website's pages. -
Test your integration.
-
Optional. Enable sending data on personal promo codes.
-
Optional. Set up backup transfer of target action data.
If your program uses more than 1 action and 1 rate, let your Admitad manager know about it. In this case, you'll receive additional information about setting up the integration.
If there are both web and mobile versions of the website and/or a quick order form or a one-click order form, set up integration with Admitad for them. Read more
How to set up eCommerce tracking
Set up eCommerce tracking for your website following these instructions from Google Analytics:
- How to set up eCommerce tracking
- How to use gtag.js for eCommerce (new type of Google Analytics)
-
eCommerce tracking with analytics.js (older type of Google Analytics)
How to grant Admitad access to orders in Google Analytics
Grant Admitad's special account access to the orders attributed to Admitad in Google Analytics.
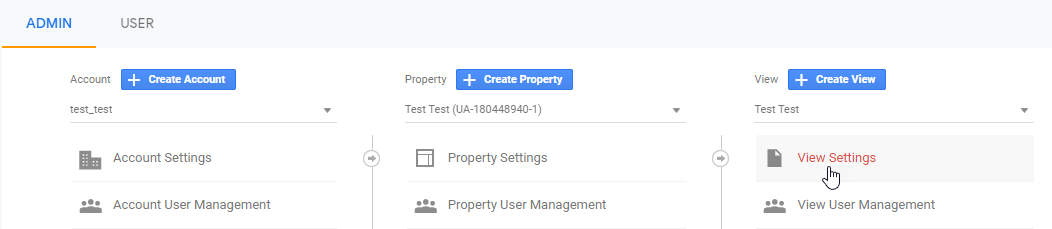
1. Log in to your Google Analytics account and click Admin.
2. In the View column, select the website with reports on actions and click View Settings.
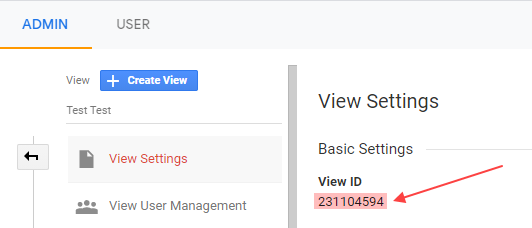
3. Share the View ID with the Admitad manager.
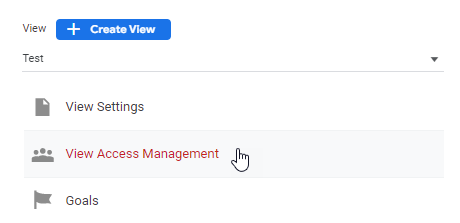
4. Go back to Admin.
If you have several websites, select the website from the dropdown list in View and click View Access Management.
5. In the upper right-hand corner, click 
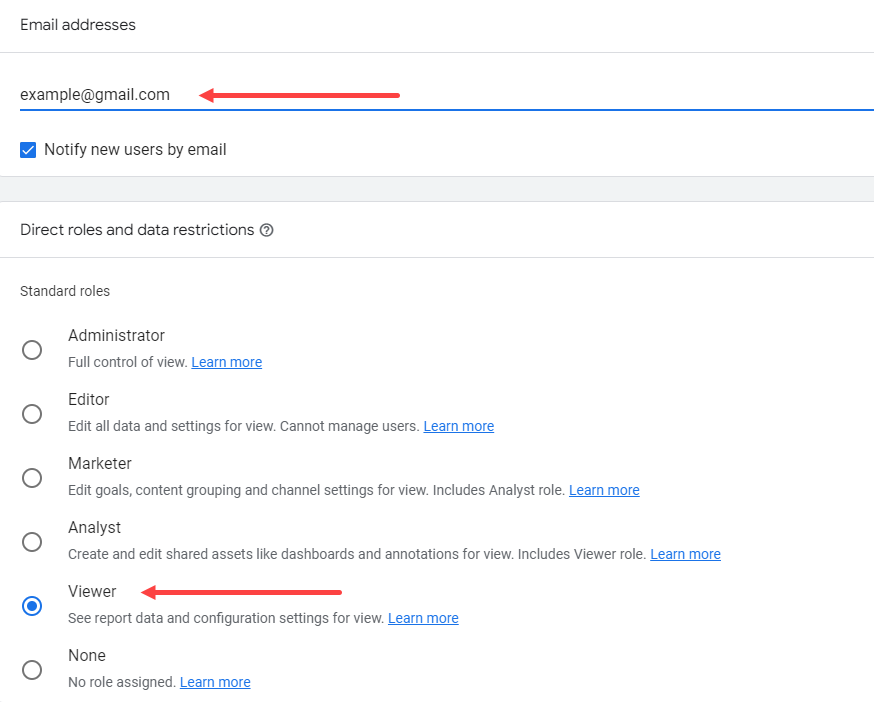
6. In Email addresses, enter the email of the Admitad special account specified in the integration instructions.
In Direct roles and data restrictions, select Viewer, then click Add.
You're all set! You have granted Admitad's special account access to the orders attributed to Admitad.
Now Admitad can receive target action data through a GET request to Google Analytics API.
-
If you plan to use the Last Non-direct Click model, tell the Admitad specialist that you:
-
Have set up eCommerce tracking
-
Have granted access to the orders attributed to Admitad in Google Analytics
You have completed the required integration steps to use the Last Non-direct Click model.
Now you can set up sending data on personal promo codes and/or backup transfer of data to Google Analytics. -
-
If you plan to use the Last Paid Click model, jump to the next stage: setting integration parameters and deploying the tracking code on the website.
How to set integration parameters and deploy the tracking code on the website
This integration setup stage is only for the Last Paid Click model.
1. In the bottom left-hand corner of your Google Analytics account, click Admin.
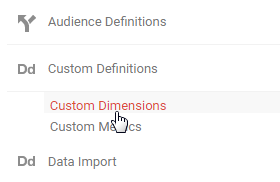
2. In the Property column, click Custom Definitions, then Custom Dimensions.
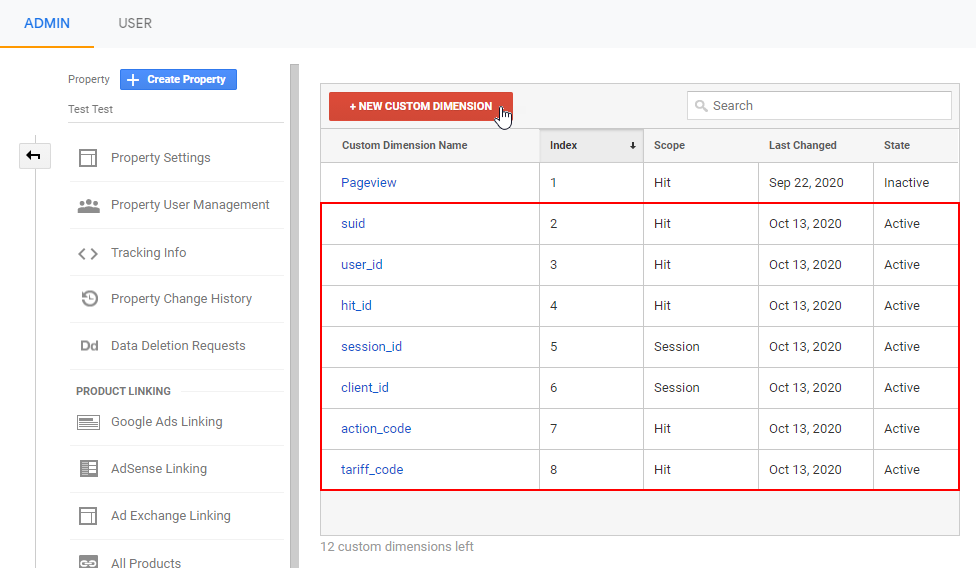
3. On the next page, click NEW CUSTOM DIMENSION and add the following parameters:
|
Custom Dimension Name |
Scope |
|
suid |
Hit |
|
user_id |
Hit |
|
hit_id |
Hit |
|
session_id |
Session |
|
client_id |
Session |
|
action_code |
Hit |
|
tariff_code |
Hit |
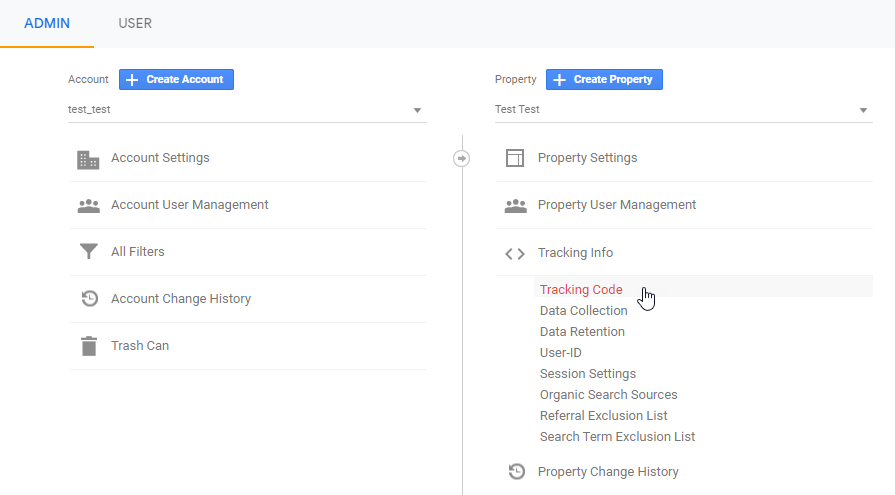
4. Go back to the Admin tab. In the Property column, click Tracking Info, then Tracking Code.
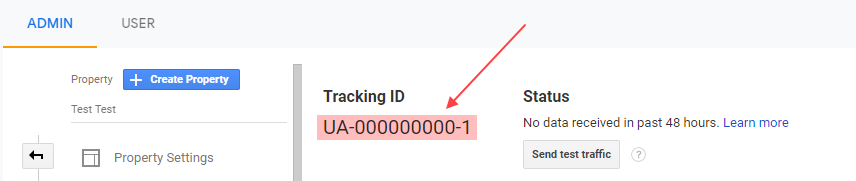
5. Copy the Tracking ID. You will need to add it to the code provided in the next step.
6. Copy the code presented below and deploy it on all pages of your website, except for the thank you page.
The code must convey all necessary variable values.
-
<!-- Global site tag (gtag.js) - Google Analytics -->
    <script async="" src="https://www.googletagmanager.com/gtag/js?id=UA-XXXXXXXXX-X">
    // instead of UA-XXXXXXXXX-X, specify your Google Analytics Tracking ID

<!-- Google Analytics custom dimensions for Admitad -->

  function clientid() {
      var match = .match('(?:^|;)\s_ga=(;)');
      var raw = (match) ? decodeURIComponent(match[1]) : null;
      if (raw) {
          match = raw.match(/(\d+.\d+)$/);
      }
      var gacid = (match) ? match[1] : null;
      if (gacid) {
          return gacid;
      }
  }

  function getTimeStamp() {
      var now = new Date();
      var tzo = -now.getTimezoneOffset();
      var dif = tzo >= 0 ? '+' : '-';
      var pad = function(num) {
          var norm = Math.abs(Math.floor(num));
          return (norm < 10 ? '0' : '') + norm;
      };
      return now.getFullYear() +
          '-' + pad(now.getMonth() + 1) +
          '-' + pad(now.getDate()) +
          'T' + pad(now.getHours()) +
          ':' + pad(now.getMinutes()) +
          ':' + pad(now.getSeconds()) +
          '.' + pad(now.getMilliseconds()) +
          dif + pad(tzo / 60) +
          ':' + pad(tzo % 60);
  }

  function getSessionId() {
      return new Date().getTime() +
          '.' + Math.random().toString(36).substring(5);
  }

  function uuidv4() {
    return ([1e7] + -1e3 + -4e3 + -8e3 + -1e11).replace(/[018]/g, function(c) {return (c ^ (window.crypto || window.msCrypto).getRandomValues(new Uint8Array(1))[0] & 15 >> c /   4).toString(16)});
  }

  function referrer() {
      if (document.referrer === "") {
          return "direct none"
      } else return document.referrer
  }

  window.dataLayer = window.dataLayer || [];
  function gtag() {
      dataLayer.push(arguments);
  }
  gtag('js', new Date());

  gtag('config', 'UA-XXXXXXXXX-X'); // instead of UA-XXXXXXXXX-X, insert your Google Analytics Tracking ID here and in the next string
  gtag('config', 'UA-XXXXXXXXX-X', {
      'custom_map': {
          'dimensionX': 'suid',
          'dimensionX': 'client_id',
          'dimensionX': 'user_id',
          'dimensionX': 'session_id',
          'dimensionX': 'hit_id'
      } // for dimensionX, instead of Х, insert the respective parameter indices (see the Index column)
  });
  gtag('event', 'apv', {
      'suid': uuidv4(),
      'client_id': clientid(),
      'user_id': 'user ID in your system', // if the ID is unknown, pass the empty string. Learn more about User ID settings
      'session_id': getSessionId(),
      'hit_id': getTimeStamp(),
  });
7. Copy the code presented below and deploy it on the thank you page.
-
<!-- Global site tag (gtag.js) - Google Analytics -->
    <script async="" src="https://www.googletagmanager.com/gtag/js?id=UA-XXXXXXXXX-X">
    // instead of UA-XXXXXXXXX-X, specify your Google Analytics Tracking ID

    <!-- Google Analytics Ecommerce with custom dimensions for Admitad -->

window.dataLayer = window.dataLayer || [];

function gtag() {
    dataLayer.push(arguments);
}
gtag('js', new Date());

gtag('config', 'UA-XXXXXXXXX-X'); // instead of UA-XXXXXXXXX-X, insert your Google
  Analytics Tracking ID here and in the next string
gtag('config', 'UA-XXXXXXXXX-X', {
    'custom_map': {
        'dimensionX': 'suid',
        'dimensionX': 'client_id',
        'dimensionX': 'user_id',
        'dimensionX': 'hit_id',
        'dimensionX': 'action_code',
        'dimensionX': 'tariff_code'
    } // for dimensionX, instead of X, insert the respective parameter indices(see the Index column)


});

ga_items = [];

var list_position = 1;

// repeat this code fragment for each item in cart ga_items.push({
    "id": "{{ item.product_id }}",
    "name": "{{ item.product_title }}",
    "quantity": "{{ item.quantity }}",
    "price": "{{ item.price }}",
    "category": "{{ item.product_type }}",
    "list_position": list_position,
    "variant": "{{ item.variant }}",
    "brand": "{{ item.brand }}",
});
list_position = list_position + 1;
// end of the repeating code fragment

function getTimeStamp() {
    var now = new Date();
    var tzo = -now.getTimezoneOffset();
    var dif = tzo >= 0 ? '+' : '-';
    var pad = function(num) {
        var norm = Math.abs(Math.floor(num));
        return (norm < 10 ? '0' : '') + norm;
    };
    return now.getFullYear() + '-' + pad(now.getMonth() + 1) + '-' + pad(now.getDate()) + 'T' + pad(now.getHours()) + ':' + pad(now.getMinutes()) + ':' + pad(now.getSeconds()) + '.' + pad(now.getMilliseconds()) + dif + pad(tzo / 60) + ':' + pad(tzo % 60);
}

function clientid() {
    var match = .match('(?:^|;)\\s*_ga=([^;]*)');
    var raw = (match) ? decodeURIComponent(match[1]) : null;
    if (raw) {
        match = raw.match(/(\d+.\d+)$/);
    }
    var gacid = (match) ? match[1] : null;
    if (gacid) {
        return gacid;
    }
}

function getSessionId() {
    return new Date().getTime() +
        '.' + Math.random().toString(36).substring(5);
}

function uuidv4() {
    return ([1e7] + -1e3 + -4e3 + -8e3 + -1e11).replace(/[018]/g, function(c) {return (c ^ (window.crypto || window.msCrypto).getRandomValues(new Uint8Array(1))[0] & 15 >> c /   4).toString(16)});
  }

gtag('event', 'purchase', {
    "transaction_id": "{{ order_number }}",
    "affiliation": "",
    "currency": "{{ shop.currency }}",
    "shipping": "{{ shipping_price }}",
    "items": ga_items,
    "session_id": {{coupon}}, // specify the value if you have a personal
  promo code. Learn more
    "action_code": "{{ action_code }}", // copy the value from the table on the
  Setting up integration via Google Analytics API page (menu → Program → Integration → Next → Custom integration (tab) → Google analytics API → Next)
    "tariff_code": "{{ tariff_code }}", // copy the value from the table on the
  Setting up integration via Google Analytics API page (menu → Program → Integration → Next → Custom integration (tab) → Google analytics API → Next)
    "suid": uuidv4(),
    "client_id": clientid(),
    "user_id": "user ID in your system", // if the ID is unknown, pass the empty string. Learn more about User ID settings
    "session_id": getSessionId(),
    "hit_id": getTimeStamp(),
});
You're all set! You have set integration parameters and deployed the tracking code on your website's pages.
Now tell the Admitad specialist that you:
- Have set up eCommerce tracking
- Have granted access to the orders attributed to Admitad in Google Analytics
- Have set up special parameters and deployed the code containing their values on your website's pages.
The Admitad specialist will prepare an order handler that will use the following parameters:
-
dimensions:
- ga:transactionId — order number
- ga:productSku — product ID (can be used to determine the rate)
-
ga:adContent — content of the
utm_contenttag (used to store the value ofadmitad_uid); - ga:dateHourMinute — order date and time
- ga:currencyCode — currency code
-
metrics:
- ga:itemRevenue — order number
-
ga:couponCode — promo code
How to set up order deduplication
Deduplication is a data processing method that helps identify a paid traffic source to attribute an order to it and remove duplicate target actions if any.
If you are using integration via Google Analytics API, you don't have to set up deduplication:
-
For the Last Non-direct Click model. Action deduplication is set up by default there.
-
For the Last Paid Click model. The last paid source will be determined by the value of the transition parameter
utm_source. If the value isutm_source=admitad, the order will be attributed to Admitad Partner Network.
How to test integration after setup
To test integration via GA API:
1. Get a test affiliate link on (Setting up integration through a tracking code — Integration testing).
-
1.1 In your account, go to the Integration section (Program → Integration).
1.2 Click Next and, on the Integration methods page, open the Custom integration) tab.
1.3 In Custom integration, choose Tracking code and click Next.
1.4 The Integration testing section is located at the lower part of the screen.
2. Follow the link and perform a target action per the terms of your program.
For example, if you only pay a publisher when a user purchases a certain product, buy this very product.
Recommendations for integration testing:
-
If you have several actions and/or rates, place a few test orders to try out all actions and rates.
-
Include several items in one of your test orders to make sure the items and the total amount are generated correctly.
-
If you have a quick order or one-click order form, use it to place an order and test the form integration.
3. Go to your Google Analytics account, and in the left-hand panel, select Conversions → Ecommerce → Transaction.
4. In the Explorer tab, click Secondary dimension (1), then Commonly used (2) → Source (3).
5. In the search field (4), type "admitad" and click the search button.
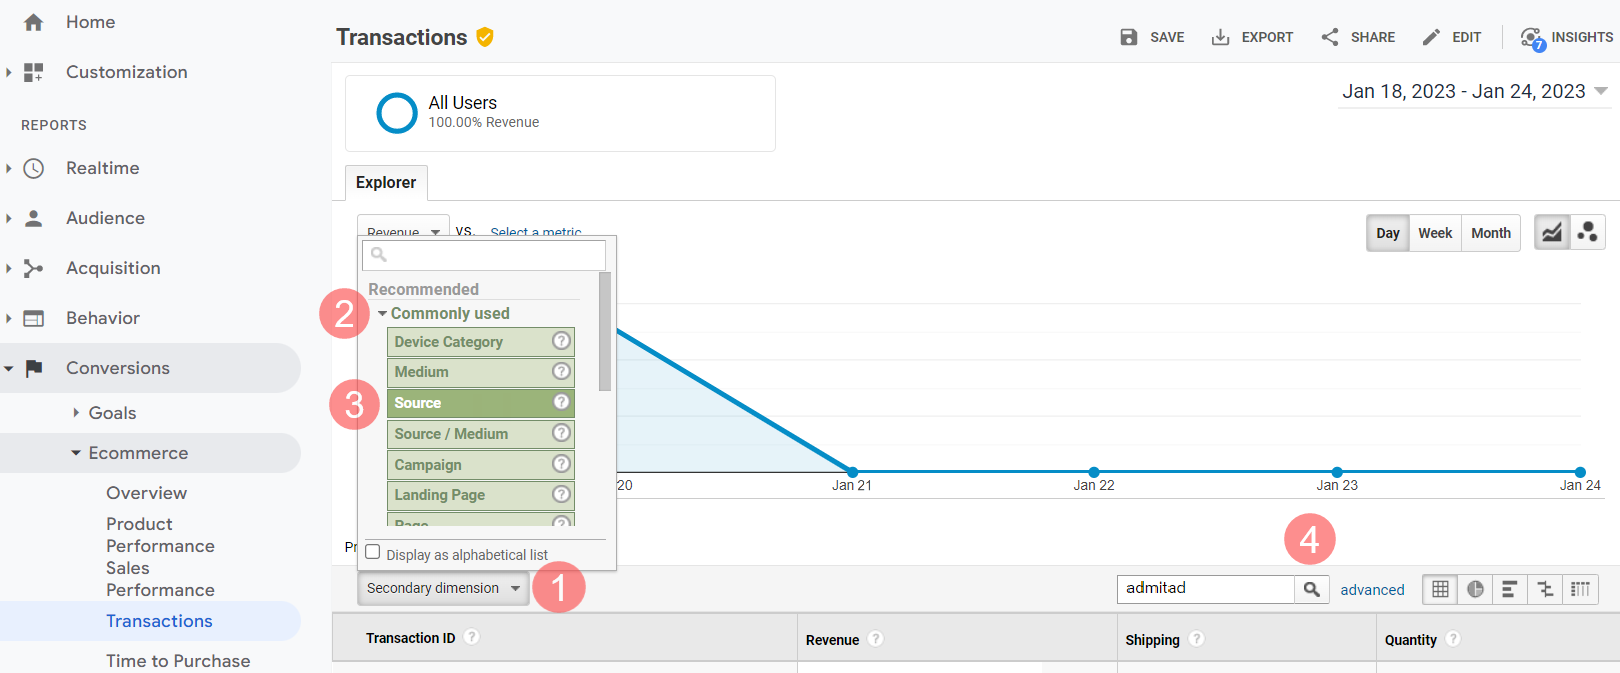
6. If your integration is set up correctly, you will see the order list that should display all test orders, and the traffic source will be admitad.
You're all done! Integration testing is now complete.
Notify your Admitad manager once integration testing is over. They will start preparing your program for launch.
How to set up sending data on personal promo codes
Setting up sending data on promo codes is an optional stage of the integration.
Personal promo codes are promo codes that contain a unique code word by which target actions are tracked. Such promo codes are assigned to certain publishers. Learn more about personal promo codes
To use personal promo codes:
- The Promo code field must be in the order form on the website.
- Passing Enhanced Ecommerce tags should be enabled and set up in the Google Analytics account.
Do the following to set up sending data on personal promo codes:
1. Create a personal promo code with a unique codeword for your website.
2. Copy the personal promo code from the order form and paste it into the coupon parameter in Google Analytics. Examples:
- gtag.js — new type of Google Analytics
- analytics.js — older type of Google Analytics
When an order comes through with a coupon value that matches the personal promo code created in the system, the order will be attributed to the publisher associated with that promo code.
Setting up passing promo code data is not required when you pass orders with a standard promo code (not a personal promo code).
How to set up backup transfer of data
If the Google Analytics "counter" was blocked by an ad-blocking extension in the user's browser, Google Analytics may not register the user's target action.
To make sure the target action is registered correctly, you can pass target action data to Google Analytics from your database using the Google Measurement Protocol for statistics.
To set up backup transfer of target action data, do the following:
1. Upon a user's visit to your website, extract UTM tag values from the affiliate link and rewrite them if they are new users.
-
<!--?php

$cookie_name = 'utm_cookie'; $expires_days = 90;

  foreach ($GET as $param_name => $param_value) { if (substr($param_name, 0, 4) === 'utm')
  { $cookie_string = $cookie_string . $param_name . '=' . $param_value . ';'; }
  }


  if (isset($cookie_string)) { setcookie($cookie_name, $cookie_string, time() +
  $expires_days * 24 * 60 * 60, '/'); } ?-->
2. Pass UTM tags with other order data to the website database.
3. Pass order data from the website database to Google Analytics using the Google Measurement Protocol.
You can set up the transfer of data from the website database to Google Analytics using the Google Measurement Protocol per Google's documentation.