Integration is a process in which you set up how to send information on target actions performed on your website to the Admitad system.
A target action is a purchase, registration, completed application, or other expected action performed by a user whom an Admitad publisher led to your website.
General information. Features and tips
- You can only initiate integration if your program has:
- A tracking link is already generated in General Settings (instruction);
- A target action added, and a related rate set up in Actions (instruction).
If you have a personal manager, they can do all that for you.
- Integration is a mandatory step to continue your work and launch an affiliate program with Admitad.
- To speed up the integration, we recommend involving your technician and providing them with these instructions.
Once the integration is complete, all target action details (date, order ID, order amount, etc.) will be sent to Admitad automatically.
Specifics of the integration via GTM Template
- When setting up the integration via GTM, no additional scripts are called in the site's code, as the code required for tracking works only within the GTM container.
- GTM is susceptible to ad blockers. Information about some target actions may not reach Admitad because the information transfer from the user's browser can be blocked by AdBlock or other ad-blocking extensions, antivirus software, or simply privacy settings.
- For proper tracking setup through GTM, you must have a configured data layer to which information about target actions is transferred.
- If your program provides for different reward rates depending on the product category, the integration setup via GTM will be more complex: you will need to refine the data layer.
How to install a template
1. In GTM, open the required container and go to the Templates section.
2. Click Search Gallery next to Tag Templates.
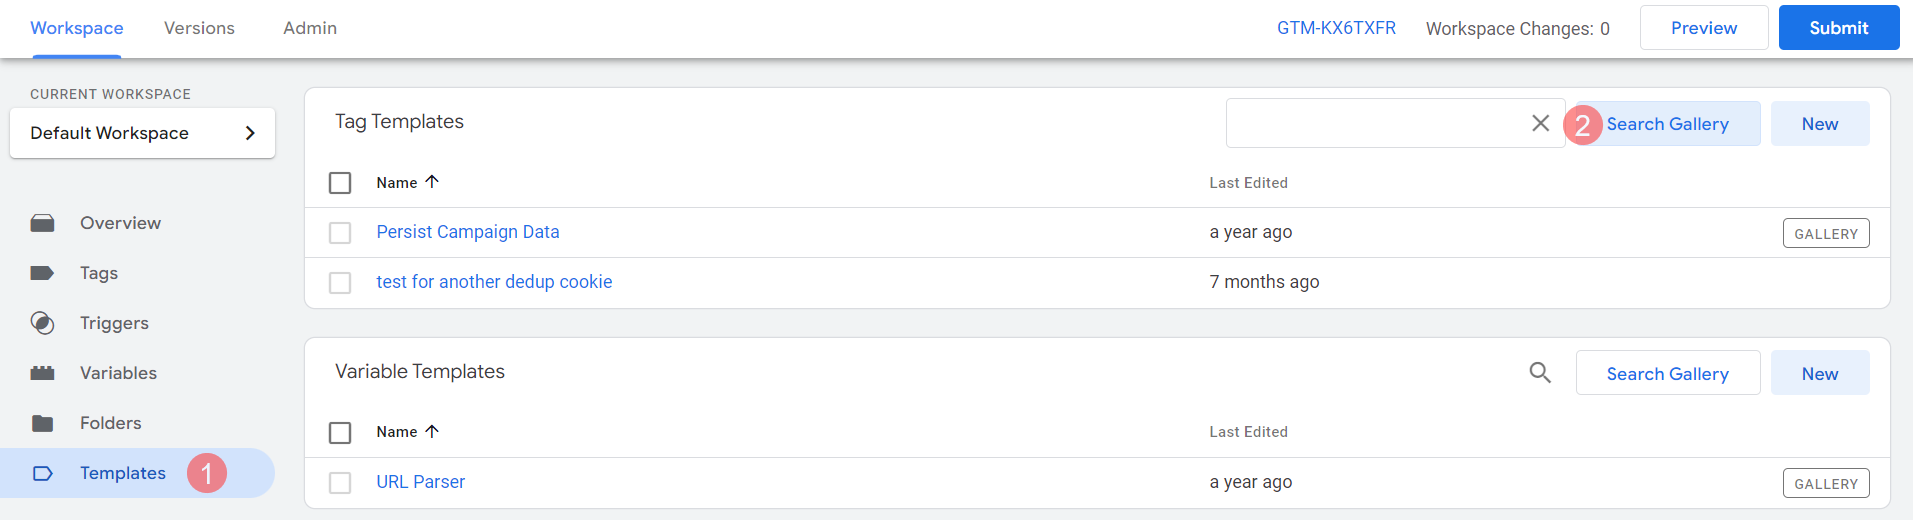
3. Find the Admitad Tracking option on the page and select it.
4. In the upper-right corner, click Add to workspace.
5. In the pop-up window, click Add.
Done! The template has been installed. Now you need to create a tag.
How to create a tag
1. In the left menu, select Tags → New.
2. In the right-hand menu, select Admitad Tracking.
3. Complete the form.
Campaign code — this is a unique value provided to you by your personal Admitad manager.
-
1. In your account, go to Program → Integration.
2. Click Next and, on the Integration methods page, open the Custom integration tab.
3. Select Tracking code in GTM and click Next.
4. In the Integration Settings: Unique parameter values for your program section, find the campaign_code parameter in the table and copy its value from the Value field.
Type of cart tracking: choose how to transfer order information to Admitad:
- Total cart amount — the order number (transaction ID, conversion ID, lead ID, etc.), the total order amount, and the order currency are transferred. Choose this type if the order includes different target actions and rewards for them (for example, Purchase by new customer / Purchase by existing customer), or when the program includes one target action (for example, Purchase or Balance top-up).
- Position-by-position — the cart contents are transmitted as an array. Choose this type if you have different rewards for products that can be in one order.
Action code: depends on how many target actions you have in your program.
- If the program has one type of target action (for example, paid order or approved request), you can specify a constant value. Your personal Admitad manager will provide it to you.
-
1. In your account, go to the Program → Integration section.
2. Click Next and on the Integration methods page, open the Custom integration tab.
3. Select Tracking code in GTM and click Next.
4. In the Integration settings: unique parameter values for your program section, find the value in the Action code field. - If the program has several types of target actions, the value should be a variable in the data layer. Your personal Admitad manager will provide it to you. If you do not work with a personal manager, open the Program → Actions and rewards section in your account. The value will be indicated in the Code column.
Tariff code (field active if you selected Total cart amount in the Type of cart tracking field) — a constant value, will be provided by your personal Admitad manager during integration.
-
1. In your account, go to the Program → Integration section.
2. Click Next and on the Integration methods page, open the Custom integration tab.
3. Select Tracking code in GTM and click Next.
4. In the Integration settings: unique parameter values for your program section, find the value in the Rate code field.
Order number — specify the variable of the action number (transaction ID, conversion ID, lead ID, etc.), which is transmitted to Admitad and then displayed in Admitad reports.
Order amount (field active if you selected Total cart amount in the Type of cart tracking field): specify the variable of the total order amount. This is the amount that will be displayed in Admitad reports and for which the publisher's reward will be calculated. The variable should transmit the final amount obtained after applying all discounts and excluding the cost of additional services (e.g., delivery).
If the reward has a fixed rate, you can specify "0".
Order currency (field active if you selected Total cart amount in the Type of cart tracking field) is the payment currency variable. If only one currency is provided for any purchase, you need to specify a constant currency code value: EUR, USD, AED, INR, etc.
Products array (field active if you selected Position-by-position in the Type of cart tracking field): specify the cart contents variable (more details).
Promocode: specify the promo code variable applied to the order.
Last Paid Click URL Parameter: specify the URL parameter that will identify the paid traffic source. In most cases, this will be utm_source. The value must be a constant.
Additional Last Paid Click URL Parameters: you can leave this field empty. Specify any other parameters apart from Last Paid Click URL Parameter, if you have paid sources without it. Parameters should be specified comma-separated, without quotes and spaces.
Example: gclid,fbclid
Cookie lifetime (days) — specify the tracking period for cookies as stated in the agreement.
suid — leave the value 'gtm_template'.
User agent — leave the value 'gtm_template'.
Specify the main domain (for cookies)
- If your site uses third-level domains, specify the main domain.
Example: www.example.com, catalogue.example.com, cart.example.com — specify .example.com in the field. - If your site does not use third-level domains, leave the field empty.
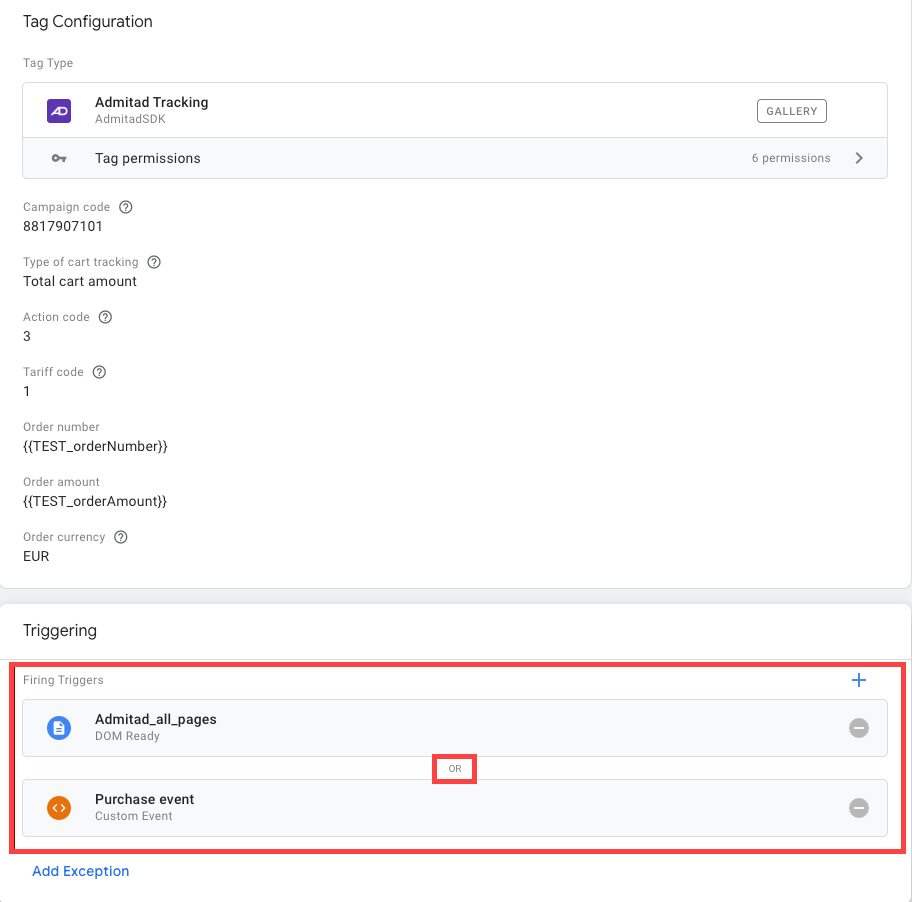
4. Set the All Pages (Page View DOM Ready) trigger for the tag.
If your site is set up as a single-page application (SPA), set a second trigger for the tag — an event such as "Purchase" or any other event that occurs when a user performs a target action.
Both triggers can be set for any type of site, not just SPA.
5. Name the tag Admitad Tracking and save it. Click Publish to publish the changes.
How to configure variables for correct tracking
For the type Total cart amount
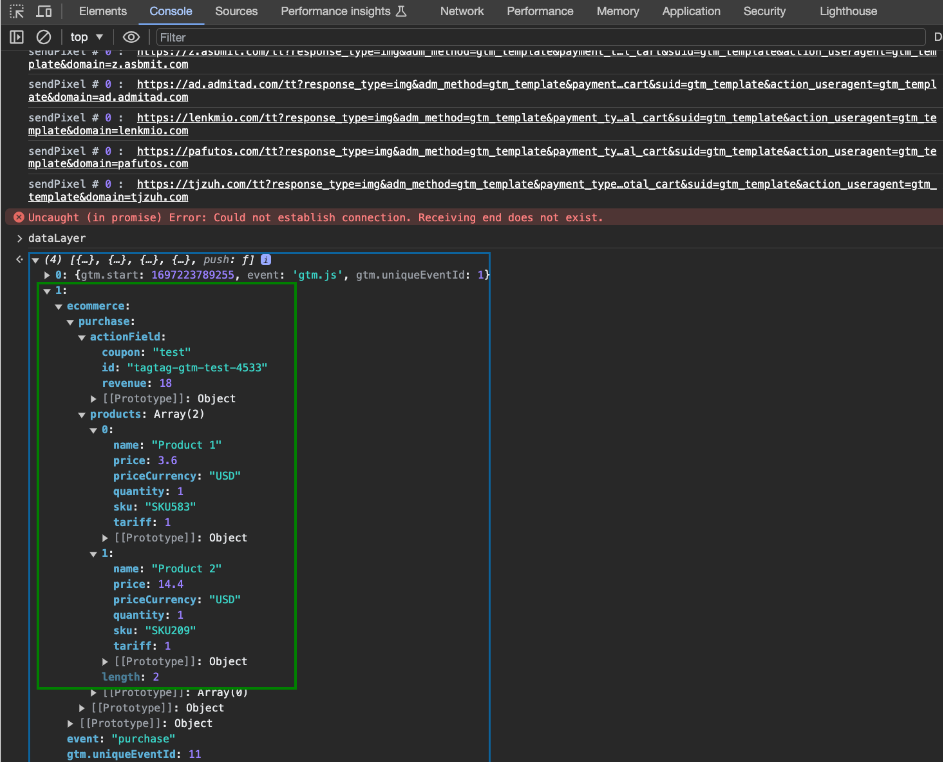
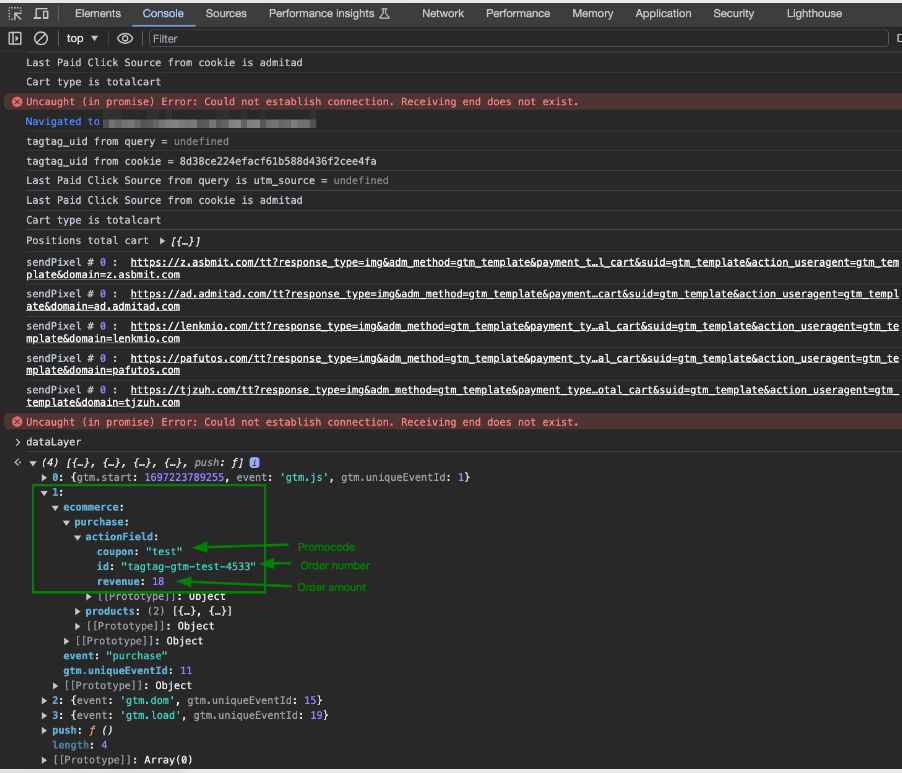
It is recommended to pass all order parameters in one event. When Order number and Order amount are defined in the data layer, the template activates and sends information about the action to Admitad.
In the example in the screenshot, the variables in the data layer are:
- Order number = ecommerce.purchase.actionField.id
- Order amount = ecommerce.purchase.actionField.revenue
- Promocode = ecommerce.purchase.actionField.coupon
For the Position-by-position type
It is recommended to pass Order number, Promocode, and Products array in one event. When Products array is defined in the data layer, the template activates and sends information to Admitad.
Each product in the array must have the necessary Admitad parameters:
- tariff — product category (provided by Admitad employees)
- price — final cost of an order's item
- priceCurrency — currency
- quantity — item quantity
- sku — item SKU
In the example in the screenshot, the product variable in GTM is set as ecommerce.purchase.products.