
To draw publishers' attention to your program, you can publish promo banners that will be shown on the pages of the publisher accounts.
- Read more about banners in the Banners and Links section here.
Where to deploy a promo banner
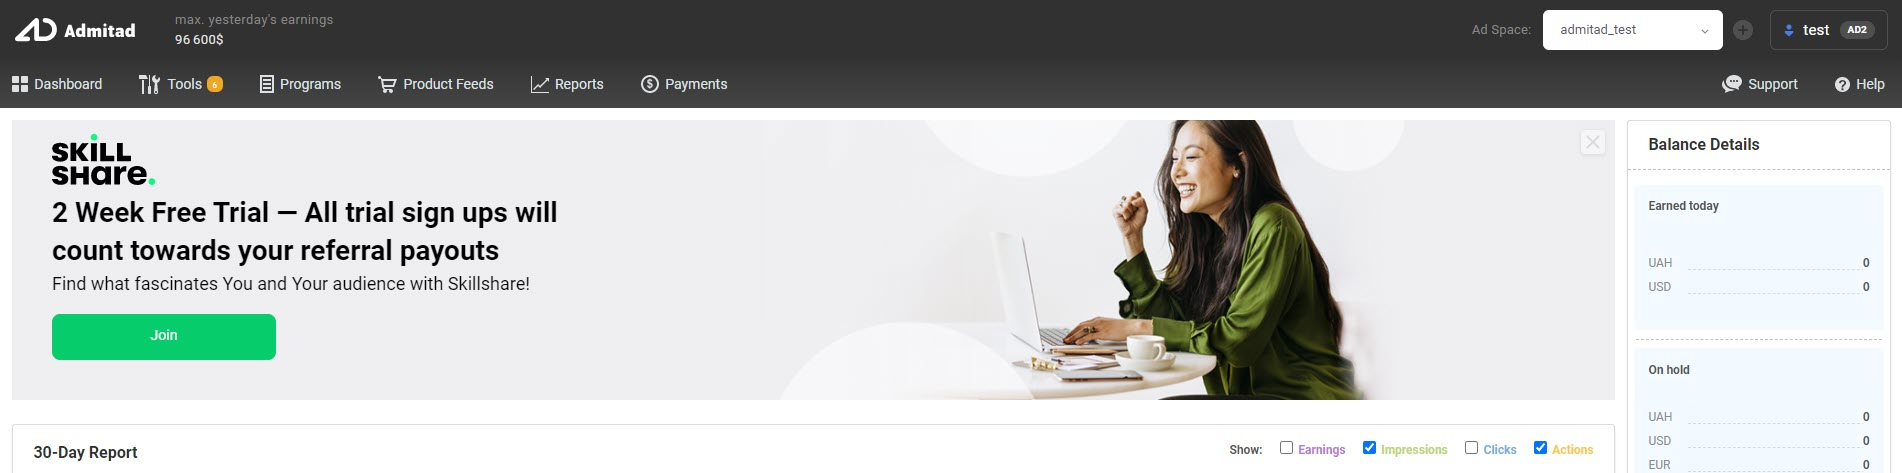
- On the main page of the publisher account:
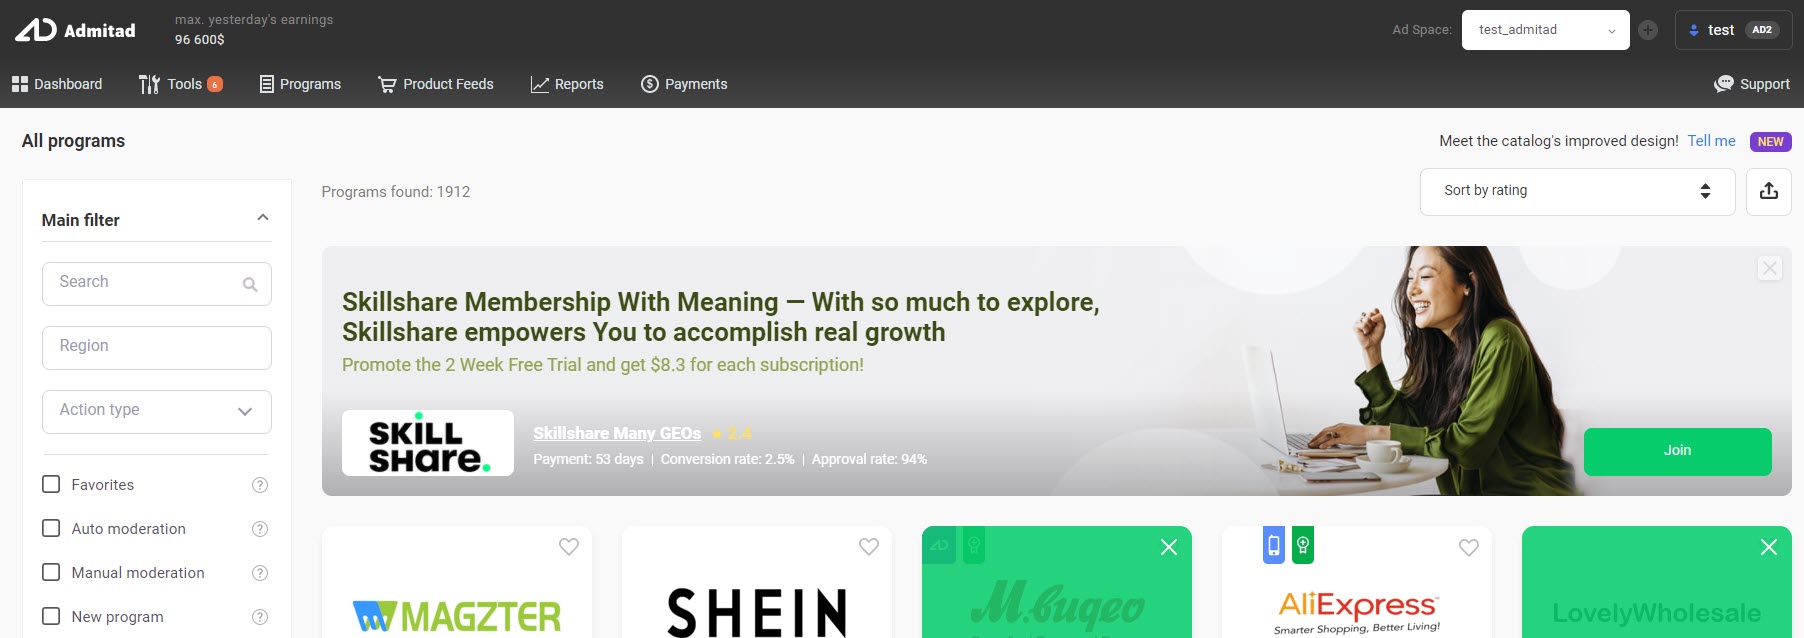
- In Admitad Store:
- Under the main menu on all pages of the account:

How to publish a promo banner
- Learn the publishing terms from your manager.
- Agree on the place and period of publishing the promo banner with your manager.
- Prepare the HTML banner following the instruction below and send the file archive to your manager.
The banner must meet all the requirements specified in the instruction; otherwise, it will not be accepted.
Preparation tips. Promo banner requirements
- You have to edit and modify the banner in the file index.html.
For that, use an HTML editor: e.g. sublimetext.com, brackets.io, atom.io.
- You cannot rename the file index.html in the banner files folder.
- If you change the name or format of other files in the folder, you need to rename them or change their format in the file index.html.
- Allowed file formats: HTML, CSS, GIF, PNG, JPG, JPEG и SVG.
Logos must be uploaded in SVG.
- The total size of all files in the final folder must not exceed 350 kB.
- You may not use the following in the banner code:
- browser extensions or plugins (Adobe Flash etc.)
- scripts (popups, spoofing, etc.)
- video and audio tracks
- links to external resources (except cdn.admitad.com and cdn.admitad-connect.com)
- The HTML code in the file must be clear and readable.
- The banner must properly work for all the users, on all platforms, in the two latest browser versions.
How to prepare an HTML banner
Banner on the publisher account's main page
1. Such a banner consists of the following elements:
- company logo (1)
- title text (2)
- banner description text (3)
- CTA button (4)
- image that depicts the program's subject or the banner's content (5)
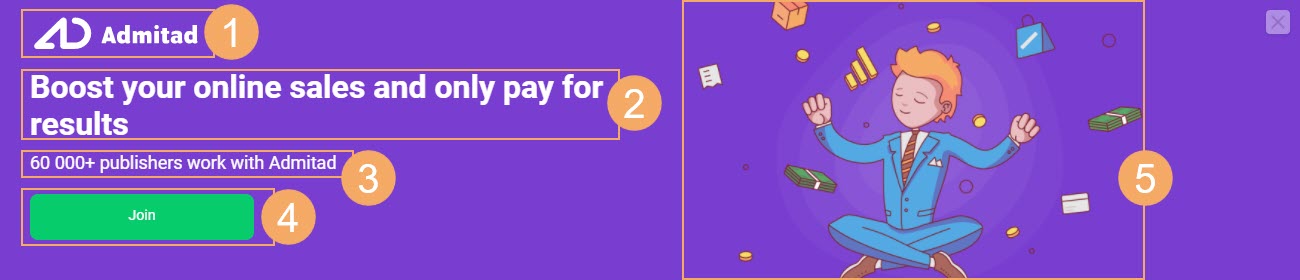
You can change or edit all these elements.
2. Download and unpack the banner files archive: download the archive.
There, you will see the following files:
- logo_210x80.svg is the logo example
- img_700x450.png is the example of an image for the right part of the banner
- index.html is the file that you need to edit if you want to modify the banner
- preview-dashboard.html is the banner preview file
3. Open the file index.html in an HTML editor.
You can edit the elements that have a comment in the code string.
| Code string in index.html (editable values are highlighted in blue) | Comment in index.html |
| background: #7A3DD0; | /*banner background color*/ |
| color: #fff; | /*title color*/ |
| color: #fff; | /*text color */ |
| color: #fff; | /*button text color */ |
| background: #00d06c; | /*button background color*/ |
|
color: #fff; background: #11e17d; |
/*button text and background color on hover*/ |
|
color: #fff; background: #00b04a; |
/*active button text and background color*/ |
| <img class="promo__bg" src="<span class="wysiwyg-color-blue">img_700x450.png" alt=" "> | <!--banner image--> |
| <img class="promo__logo" src="<span class="wysiwyg-color-blue">logo_210x80.svg" alt=" "> | <!--company logo--> |
| <h1 class="promo__title">Boost your online sales and only pay for results</h1> | <!--title text--> |
| <p class="promo__text">60 000+ publishers work with Admitad</p> | <!--description text--> |
| <div class="promo__btn">Join</div> | <!--button text--> |
Besides, you can see how your changes in index.html affect the banner's appearance.
For that, open the preview file preview-dashboard.html in your browser.
Make changes to index.html and then save them (Ctrl+S или ⌘+S).
After that, get back to the preview page and refresh it. All the changes will apply and you will see them in the banner.
4. Add your company logo to the banner files folder.
Specifications and recommendations:
- Format: SVG only.
- If the banner background is not too contrasting for the logo, use the backing layer.
- To make sure the logo is properly displayed in the banner, disable Adaptive SVG when saving the logo.
- Your logo file name must match the logo name in index.html.
To make sure they match, find logo_210x80.svg in index.html and replace it with the name of your logo file. Save the changes.

After that, you can remove logo_210x80.svg from the banner files folder.
5. Add the image you want to deploy in the banner, to the banner files folder.
Specifications and recommendations:
- Image size: 700х450px.
An image of any other size will be automatically cut to fit in the required dimensions. - Formats: GIF, PNG, JPG, JPEG, SVG.
- Your image's name and format must match those specified in index.html.
To make sure they match, find img_700x450.png in index.html and replace it with your image's name and format. Save the changes.

After that, you can remove img_700x450.png from the banner files folder.
6. Having finished editing the banner, save all the changes and preview the banner with preview-dashboard.html. Make sure all the elements you edited are displayed correctly for any screen resolution.
7. Make sure all the files are in the folder, including:
- company logo
- your image for the right part of the banner
- index.html, the final file with all the changes you made (new background color, title, banner text, etc.)
- preview-dashboard.html, the final banner preview file
8. Create the folder archive and send it to your manager.
Banner in Admitad Store
1. The banner consists of editable and uneditable elements.
Editable elements are those you can modify.
They include:
- title text (1)
- banner description text (2)
- image that depicts the program's subject or the banner's content (3)
- banner background color

The rest elements are uneditable: you cannot modify them as they are added to the banner automatically. They include:
- program logo
- program reports
- Join button
- Close button
2. Download and unpack the banner files archive: download the archive.
There, you will see the following files:
- img_700x450.png is the example of an image for the right part of the banner
- index.html is the file that you need to edit if you want to modify the banner
- preview-catalog-with-offer-ad.html is the banner preview file
3. Open the file index.html in an HTML editor.
You can edit the elements that have a comment in the code string.
| Code string in index.html (editable values are highlighted in blue) | Comment in index.html |
| background: #7A3DD0; | /*banner background color*/ |
| color: #fff; | /*title color*/ |
| color: #fff; | /*text color */ |
| <img class="promo-campaign__bg" src="<span class="wysiwyg-color-blue">img_700x450.png" alt=" "> | <!--banner image--> |
| <h1 class="promo-campaign__title">Boost your online sales and only pay for results</h1> | <!--title text--> |
| <p class="promo-campaign__text">60 000+ publishers work with Admitad</p> | <!--description text--> |
You can monitor how the changes you make in index.html affect your banner's appearance.
For that, open the preview file preview-catalog-with-offer-ad.html in your browser.
Make changes to index.html and then save them (Ctrl+S или ⌘+S).
After that, get back to the preview page and refresh it. All the changes will apply and you will see them in the banner.
4. Add the image you want to deploy in the banner, to the banner files folder.
Specifications and recommendations:
- Image size: 700х450px.
An image of any other size will be automatically cut to fit in the required dimensions. - Formats: GIF, PNG, JPG, JPEG, SVG.
- Your image's name and format must match those specified in index.html.
To make sure they match, find img_700x450.png in index.html and replace it with your image's name and format. Save the changes.

After that, you can remove img_700x450.png from the banner files folder.
5. Having finished editing the banner, save all the changes and preview the banner with preview-catalog-with-offer-ad.html.
Make sure all the elements you edited are displayed correctly for any screen resolution.
6. Make sure all the files are in the folder, including:
- your image for the right part of the banner
- index.html, the final file with all the changes you made (new background color, title, banner text, etc.)
- preview-catalog-with-offer-ad.html, the final banner preview file
7. Create the folder archive and send it to your manager.
Banner under the main menu on the pages of the publisher account
1. The banner consists of the following elements:
- company logo (1)
- banner title text (2), no more than 120 characters long
- banner background image (1920х60px)

You can change or edit all these elements.
2. Download and unpack the banner files archive: download the archive.
There, you will see the following files:
- logo_159x60.svg is the logo example
- bg_1920x60.jpg is the example of a banner background image
- index.html is the file that you need to edit if you want to modify the banner
- preview-global.html is the banner preview file
3. Open index.html in an HTML editor. You can change the elements that contain a comment in the code string.
| Code string in index.html (editable values are highlighted in blue) | Comment in index.html |
| background: url('bg_1920x60.jpg') center no-repeat; | /*banner background image */ |
| color: #fff; | /*text color */ |
| <img class="promo__logo" src="logo_159x60.svg" alt=" "> | <!--company logo--> |
| <p class="promo__text">Boost your online sales and only pay for results</p> | <!--title text--> |
The maximum length of the banner title text is 120 characters.
You can monitor how the changes you make in index.html affect your banner's appearance.
For that, open the preview file preview-global.html in your browser.
Make changes to index.html and then save them (Ctrl+S или ⌘+S).
After that, get back to the preview page and refresh it. All the changes will apply and you will see them in the banner.
4. Add your company logo to the banner files folder.
Specifications and recommendations:
- Format: SVG only.
- If the banner background is not too contrasting for the logo, use the backing layer.
- To make sure the logo is properly displayed in the banner, disable Adaptive SVG when saving the logo.
- Your logo file name must match the logo name in index.html.
To make sure they match, find logo_159x60.svg in index.html and replace it with the name of your logo file. Save the changes.

After that, you can remove logo_159x60.svg from the banner files folder.
5. Add the image you want to use as a background, to the banner files folder.
Specifications and recommendations:
- Background image size: 1920x60px.
- Formats: GIF, PNG, JPG, JPEG, SVG.
- Your image's name and format must match those specified in index.html.
To make sure they match, find bg_1920x60.png in index.html and replace it with your image's name and format. Save the changes.

After that, you can remove img_700x450.png from the banner files folder.
6. Having finished editing the banner, save all the changes and preview the banner with preview-global.html.
Make sure all the elements you edited are displayed correctly for any screen resolution.
7. Make sure all the files are in the folder, including:
- company logo
- banner background image
- index.html, the final file with all the changes you made (new background color, title, banner text, etc.)
- preview-global.html, the final banner preview file
8. Create the folder archive and send it to your manager.