
Verification means the processing of affiliates' actions. It involves comparing data in Mitgame Partner Network’s reports with data in your system and, on this basis, deciding whether to confirm or decline actions.
When can an action be declined?
- An affiliate used a prohibited traffic source;
- The rate conditions were not accomplished (a user didn’t pay for his order, canceled or returned it, filled out the form incorrectly);
- An affiliate violated Mitgame's terms;
- An affiliate violated program rules (used ad creatives or newsletter layouts you haven’t approved, spammed, used coupons with false conditions, etc.).
If the action meets all the requirements, you must confirm it.
If a customer made an order but paid only for a part of the ordered products, you should confirm the action but change the amount of the amount and the affiliate’s reward.
The results of verification determine the affiliate’s reward and the date it will be paid. Therefore, it is crucial to process actions regularly and not delay verification. A long processing time means a delay in reward payment to affiliates. This, in turn, leads to counterparties’’ complaints, a worse program rating, and negative feedback on the program on the Internet.
Actions must be processed before the expiration of the hold time specified in your agreement and the program settings.
Mitgame offers 2 types of verification:
Manual verification is more labor- and time-consuming for both the advertiser and the manager. Also, due to the human factor, errors cannot be excluded. For example, the action can be confirmed or declined by mistake, or the reward might be wrongly calculated. To avoid this, auto-verification was implemented.
The main advantage of auto-verification is its one-time setup. Thereafter, the entire process is automatic, and there’s no need to waste time processing actions. As a result, affiliates’ actions are processed faster, the number of those dissatisfied by delays decreases, and the program rating improves. Finally, if the auto-verification is set up correctly, the risk of error is close to zero. That’s why we recommend that all advertisers set up auto-verification.
Auto-verification
The standard auto-verification process looks like this:
You create an XML file where your system will periodically (usually once a day) send information about actions from the database. The Mitgame server accesses this file and uploads data to reports.
You can get detailed information on requirements for the structure of the XML file and its parameters in the article Setting up auto-verification via XML.
If you already have a file with such data, but it has a different structure and/or different parameter names, send it to the Tracking Department, and they will set up auto-verification using a template or a handler.
It is also possible to set up auto-verification via postback. In this case, your server sends the Mitgame Partner Network server postback requests containing information about updated statuses and order amounts. This type of auto-verification is mainly used by financial programs.
Before deciding whether to use automatic verification, study its requirements:
- Auto-verification should only send information on orders whose status is final.
If the order status is interim (i.e., one that might change), don’t include it in the report. - Auto-verification should encompass a long period of time.
You need to check the statuses of open orders for the past year or longer. - If the program allows partial payment of orders, such orders need to be confirmed and new, recalculated rewards for affiliates need to be specified. With auto-verification via XML and via postback, rewards are given in {reward} parameter.
If you’re unable to specify the affiliate’s reward, you must let the Tracking Department know. In this case, orders with partial payment will need to be verified manually.
Manual verification
You can conduct verification by yourself (if you have relevant access rights) or with a help of your manager.
If setting up an automatic verification is not an option, you'll have to conduct verification manually.
Verification should be conducted at least once a month.
There are 3 stages in manual verification
If you’re unable to set up auto-verification, you will have to verify manually.
Verification must be performed at least once a month.
Downloading the verification file
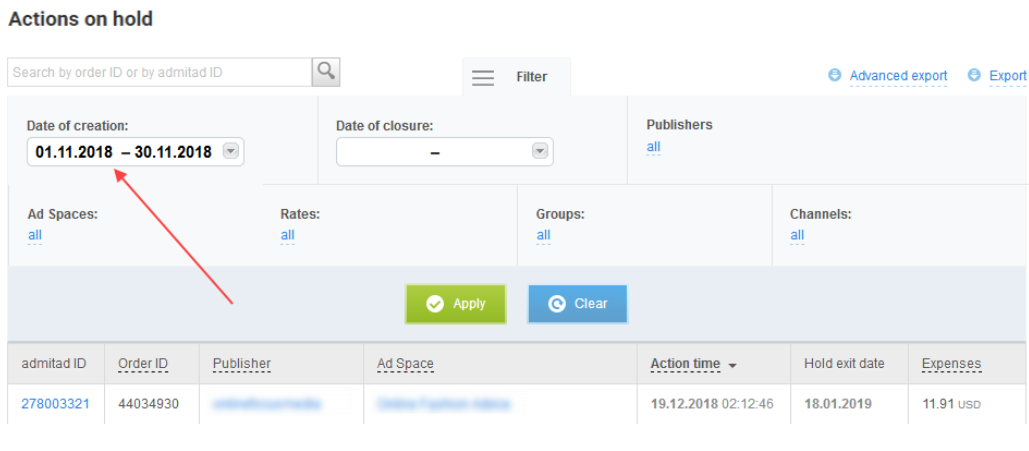
1. The verification process begins when you download action data from your account. Go to Payments → Verification → Actions on hold.
2. Use filters to choose the appropriate actions.
For example, if you’re carrying out verification for the previous month, choose this period in the Date of creation menu. Do not forget to click the Apply button.
3. Export the filtered data. This can be done in two ways:
- Export. It is the default export. The following data will be downloaded to the file:
- Admitad ID;
- Order ID;
- Affiliate;
- Ad space;
- Action time;
- Order amount;
- Status;
- Cost for affiliates;
- Cost for system;
- General expenses;
- Comment.
- Advanced export. Use this option if want to download additional data for verification or, conversely, hide data you don’t need. In that case, you can choose the data to download:
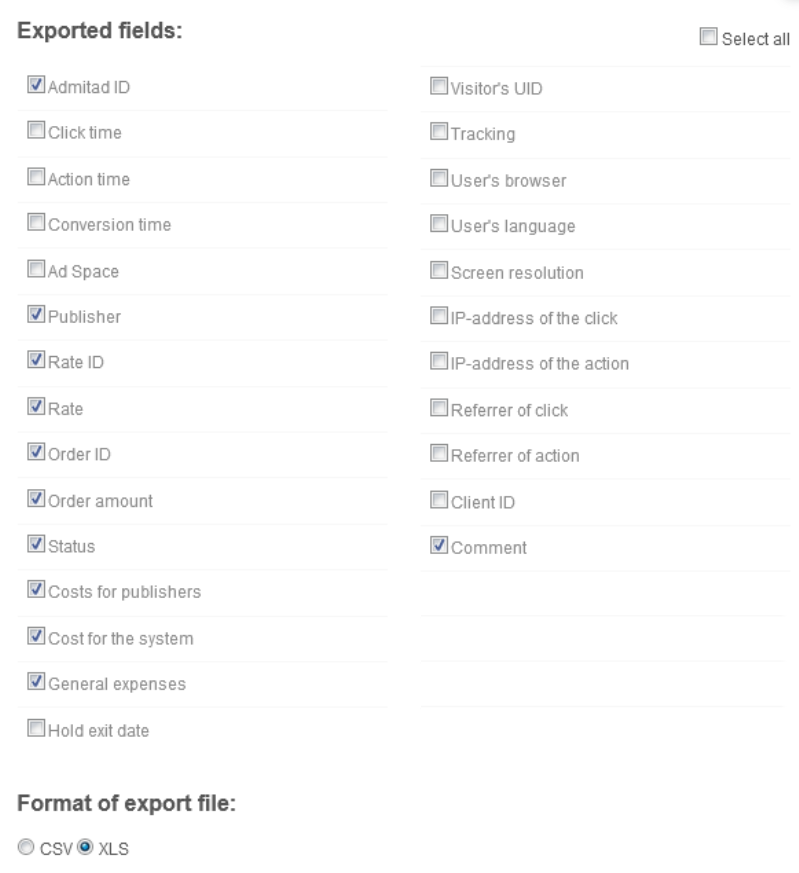
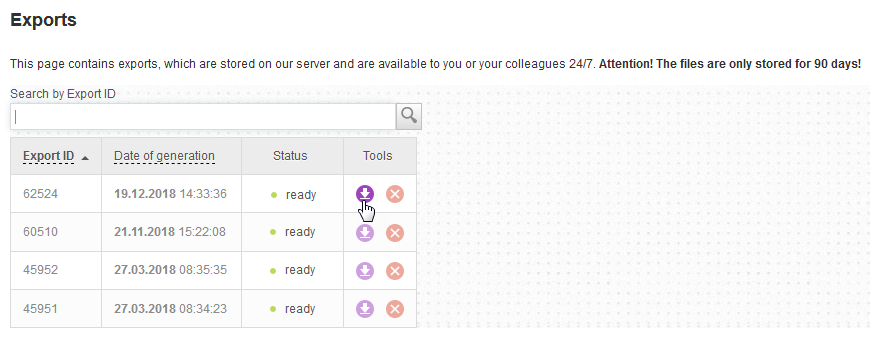
4. Go to the Exports section and download the verification file.
Processing the verification file
1. Enter statuses in the Status column in accordance with your system’s data:
0 – On hold
1 – Confirmed
2 – Declined
If you entering any other value except those above, new action information will NOT be added when you upload via file.
If the amount of the order did not change and there are no affiliates working on special terms, you don’t need to change anything else in the file.
2. If the order has been partially paid, confirm it (status 1), but don’t forget to change the amount of the order in the Order amount column and leave a comment “Partial payment of (initial order amount)” in the Comment column.
In case there are several program rates and the order contains goods with different rates, also indicate the affiliate’s reward in the Cost for affiliates column when you change the order amount (e.g., in case of partial payment). This is necessary, because the Mitgame Partner Network system has no information about the rates of goods that have been paid for, and there is no way to calculate the reward correctly.
3. If you’re working with some affiliates on special terms, change their reward in the Cost for affiliates column.
4. If you decline an action, you must give the reason in the Comment column.
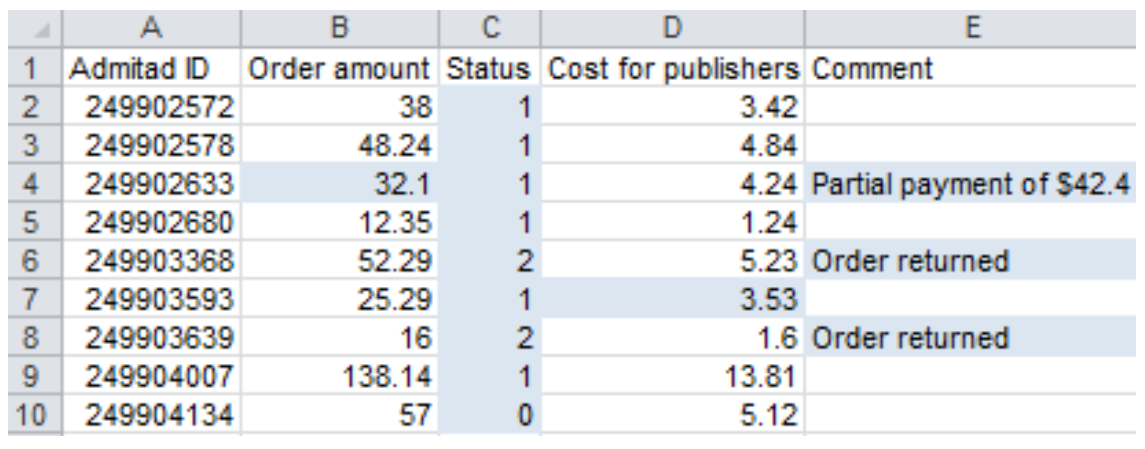
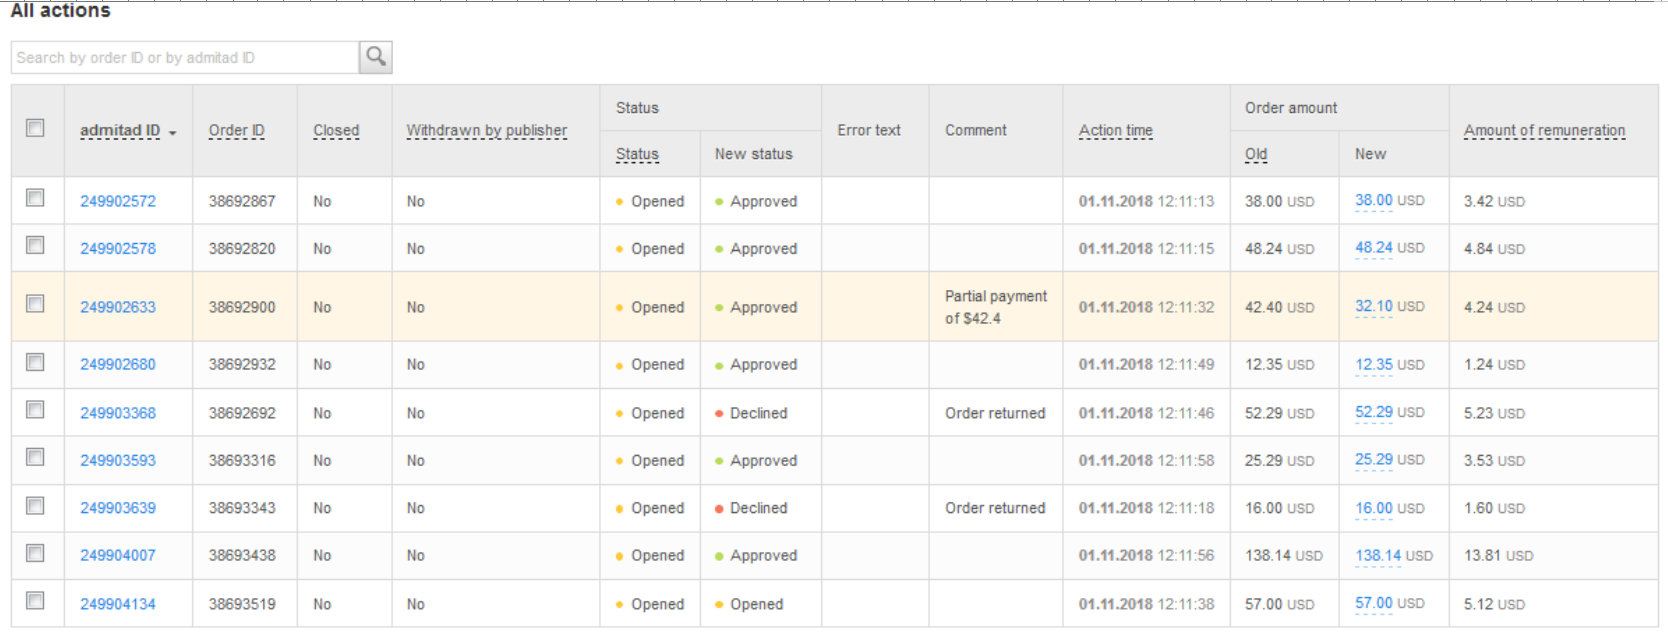
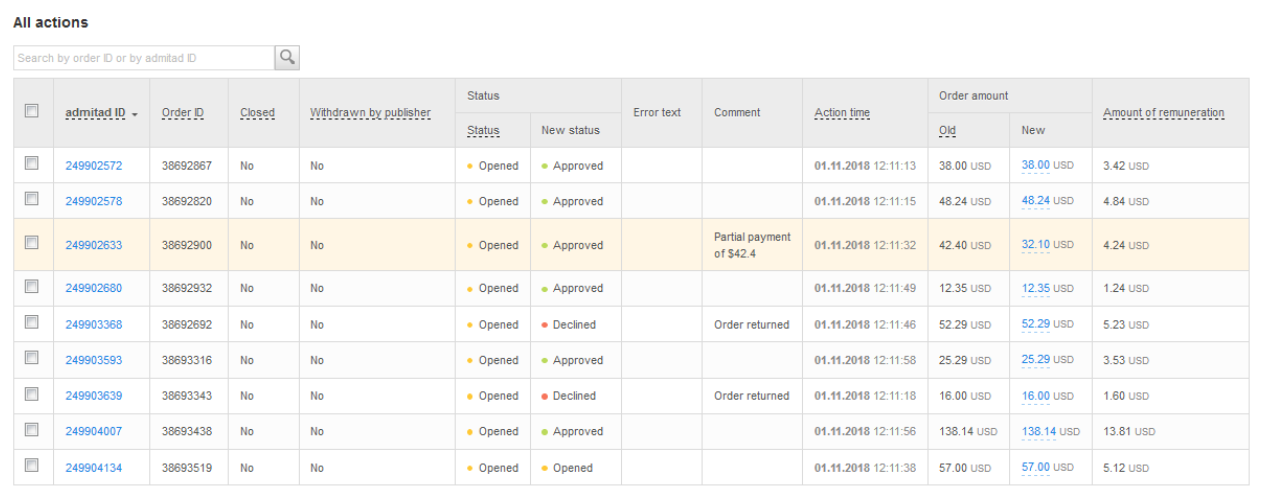
In the example given below, we’ve confirmed 7 actions, declined 2, and given 1 “on hold” status (as we still have no data about it). We’ve changed the amount of the order in string 4 and left a comment about it. But we’ve made no changes to the affiliate’s reward, as the program has only one rate, so it will be recalculated automatically. We’ve changed the Cost for affiliates value of the order in string 7, as this is a affiliate from the channel with an increased rate. We’ve mentioned the reason for the actions that were declined.
The changes are highlighted in blue.

Uploading the verification file
The final step of verification is to upload the processed file to your account. This can be done
Upload via file
1. Edit the file as follows:
| Admitad ID or Order ID | Status |
Order amount (if changed) |
Cost for affiliates (if changed) |
Comment |
Delete all other columns.
Admitad ID or Order ID must be indicated for all actions; otherwise, the actions will not be recognized by the system.
If you made no changes to order amounts or affiliates’ rewards, you can delete the Order amount and the Cost for affiliates columns.
If you changed only order amounts but want the reward to be recalculated, you must delete the Cost for affiliates column. Otherwise, the new order amounts will be uploaded to the system with old rewards.
The final file for the example given above looks like this:
In your account, go to Payments → Verification → Upload actions for verification.
Drop your file here:
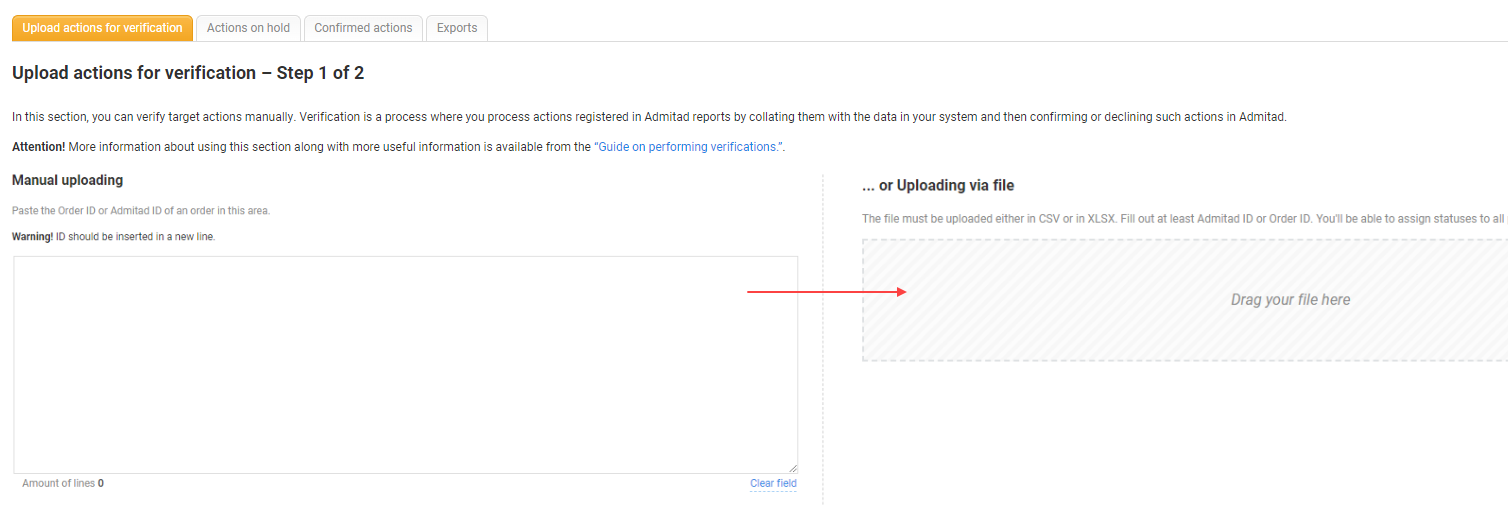
3. Once the upload is finished, you will be forwarded to step 2. Wait until the processing is complete. Renew the page to see actions uploaded from the file. You will see new data from the file in the New status and New amount columns.
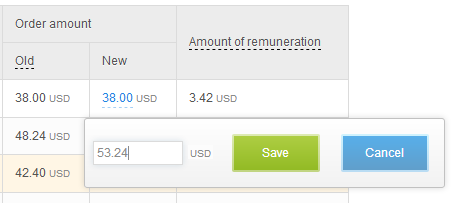
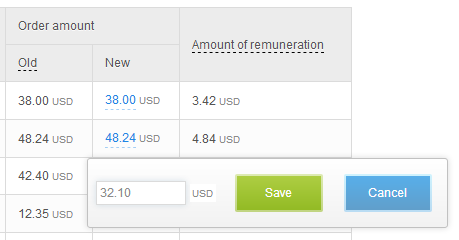
4. At this stage, you can change the order amount once again. Click on it to make changes.
5. If you decided to change an action’s status, choose a string and click the new status in the Apply to selected menu.
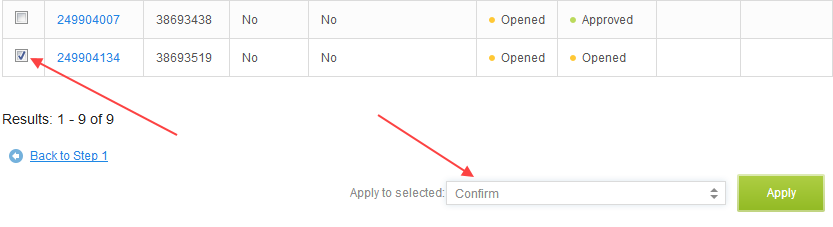
6. To save changes, choose Use new statuses in the same menu and click Apply.
Manual upload
During a manual upload, the affiliate’s reward is calculated automatically in accordance with the amount of the order. Therefore, this doesn’t work if you want to change the reward for affiliates working on special terms or for partially paid orders with different rates in the cart.
1. Filter the file data by Confirmed status (including orders with changed amounts). Copy their Admitad ID or Order ID.
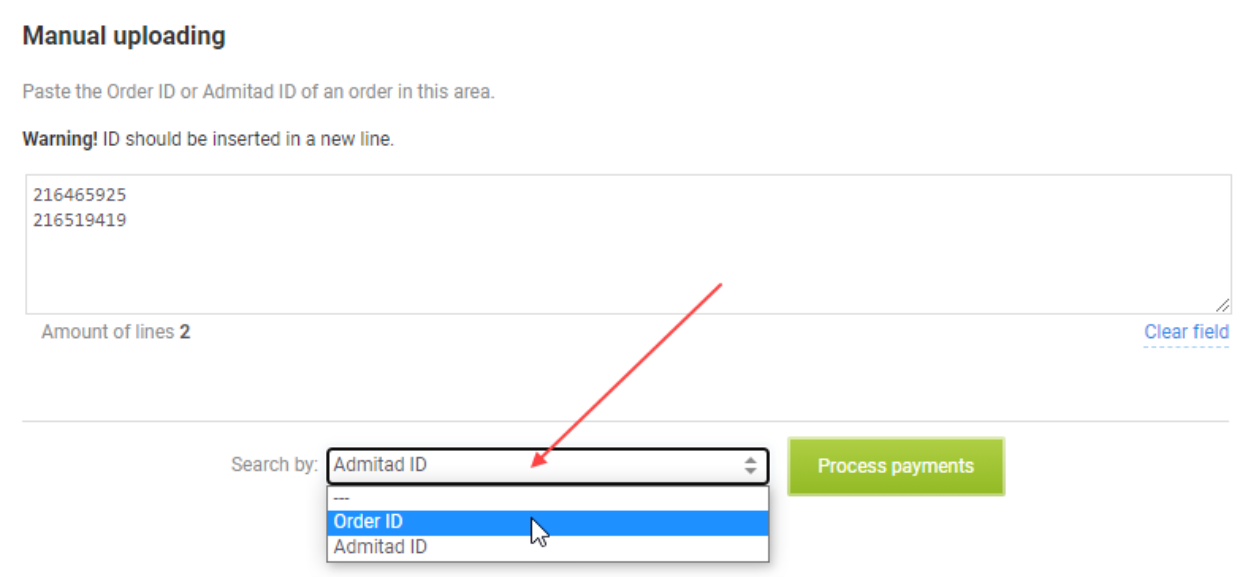
2. Go to Finances → Verification → Upload actions for verification and paste the copied data into the field for manual upload.
3. In the Search by menu, choose the value you copied. In this case, it is the Mitgo ID. Click the Process payments button.

4. Wait until the processing is complete and renew the page to see the list of uploaded payments.
5. Since the order amount of one of the confirmed actions was changed in the file, you need to change it here as well. Click the value and change it. The reward will be recalculated automatically.
6. Confirm all these payments. Click Choose all, then find Confirm in the Apply to selected menu and click the Apply button.
7. You need to do the same for the declined actions.
The actions you neither confirmed nor declined retain On hold status.
Verification problems you might face
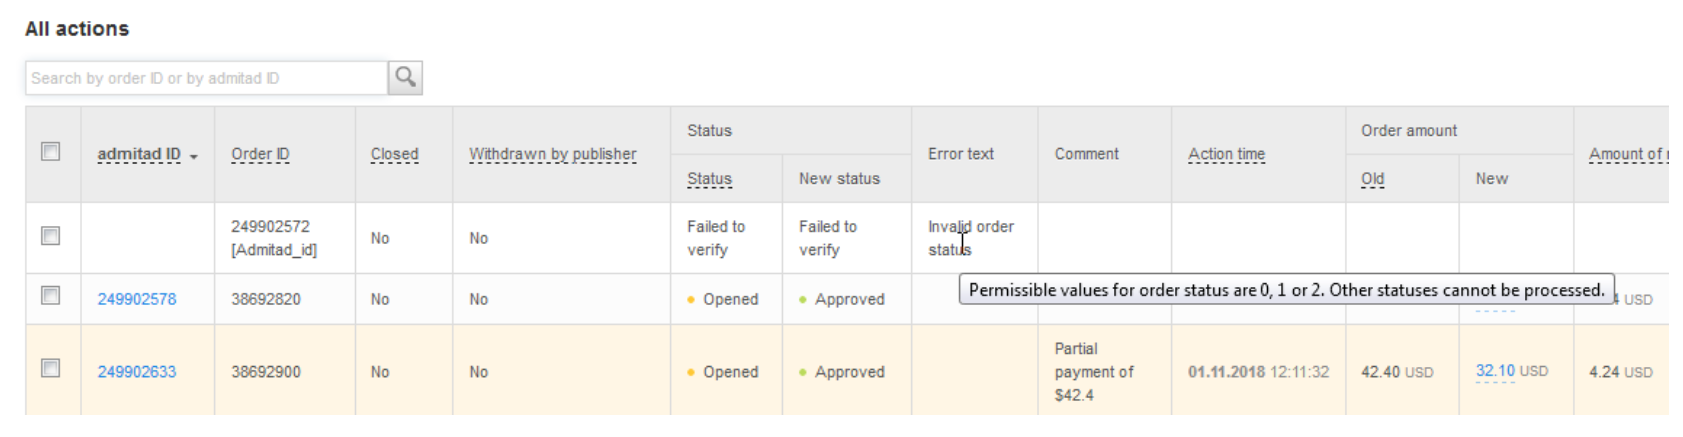
1. If you upload verification via file and see the Failed to verify message in the Status column in the string of one of the actions, it means you made an error when processing this action. The type of error (“Invalid value,” “Invalid payment ID,” etc.) will be displayed in the “Error message” field, and when you mouse over it, a hint will appear.
Explanation of error messages
| Error message | Error description | How to fix it |
| Items in the order have different rates | Impossible to calculate the reward, as there are goods with different rates in the order. | Specify the reward in the verification file. |
| Invalid order status | The status of the order should be 0, 1, or 2. | Make sure that you’ve specified the order status and that the value is one of those mentioned. |
| Invalid monetary amount | Negative order amount or affiliate’s reward. | Correct the value in the file. |
| Can’t define the reward | Impossible to calculate the reward. | Specify the reward in the file manually. |
Download all the actions the system didn’t manage to process, make corrections, and upload them again. To do so, choose the Failed to verify string in the upper report panel and click Export.
2. If all the actions are uploaded with the Failed to verify status and you see the error message Payment not found when you use the manual upload, make sure you chose the correct value in the Search by menu in step 1.
3. If you cannot uncover the problem or solve it on your own, contact the account manager.
If you upload verification files via your manager
If it’s your account manager who is responsible for downloading and uploading verifications, you just need to process the verification file sent to you as described in the “Processing the verification file” section and send it back to the manager.