Якщо ваш сайт створено на платформі Shopify, ви можете швидко інтегрувати його з системою Admitad за допомогою плагіна Admitad Tracking.
Плагін — це програмний модуль, який потрібно встановити на сайт і налаштувати. У результаті ваш сайт буде інтегрований із системою Admitad.
Загальна інформація: особливості та рекомендації
Почати інтеграцію ви можете лише за умови, що у вашій програмі:
- налаштовано партнерське посилання у розділі General settings;
- додано цільову дію та встановлено ставку для цієї дії у розділі Actions.
Якщо у вас немає менеджера, вам потрібно самостійно створити партнерське посилання (інструкція), а також додати щонайменше одну дію й щонайменше одну ставку (інструкція).
Якщо у вас є персональний менеджер, він налаштує все за вас.
- Інтеграція є обов’язковим кроком для продовження. Без неї ви не зможете запустити партнерську програму в Admitad.
- Щоб налаштувати інтеграцію, ви повинні мати доступ до адмін-панелі свого сайту на платформі Shopify. Якщо у вас немає доступу, надішліть цю інструкцію щодо інтеграції колезі, який має необхідний доступ.
Після завершення інтеграції всі дані про цільові дії — дата дії, ідентифікатор замовлення та його сума, валюта, промокод тощо — автоматично надсилатимуться до Admitad.
Як працює плагін Shopify
Admitad Tracking працює за моделлю атрибуції Last Paid Click, коли дія зараховується останньому платному джерелу трафіку.
Що таке платне джерело трафіку (розгорнути)
Платне джерело трафіку — це будь-який сторонній ресурс, за який ви платите для залучення користувачів на свій сайт за певних умов: за кожен візит на сайт, перегляд реклами, заявку, реєстрацію чи покупку.
Плагін автоматично надсилає дані про кожну цільову дію до Admitad. Admitad враховує дії, якщо вони виконані за посиланням із параметром utm_source=admitad та/або із використанням промокоду, який ви вказали у розділі Tracking promo codes свого акаунта Admitad.
Переваги
- Відстежує дії за посиланням і за промокодом.
- Використовує власну модель атрибуції, яка не залежить від внутрішньої аналітики Shopify чи сторонніх аналітичних сервісів, таких як Google Analytics 4 тощо.
- Забезпечує захищену передачу даних через back-end, що запобігає втратам даних через налаштування приватності браузерів або блокувальники реклами.
- Надає інформацію про останнє платне джерело (utm_source) та Admitad click ID (за наявності) для кожного замовлення.
Недоліки
У поточній версії плагін може відстежувати лише одну цільову дію з однією ставкою. Це означає, що у вашій програмі повинна бути додана одна цільова дія та налаштована одна ставка для цієї дії.
Як встановити плагін на сайт
1. Увійдіть до Shopify — відкриється адмін-панель вашого сайту.
2. Перейдіть до Settings → Apps and sales channels.
3. У правому верхньому куті натисніть Shopify App Store — ви потрапите до Shopify App Store.
4. Введіть Admitad Tracking у пошуку та натисніть його назву — відкриється сторінка плагіна.
5. Натисніть Install — розпочнеться встановлення плагіна, і вас буде перенаправлено на сайт.
6. У вікні, що відкриється, перегляньте інформацію про те, які дані з вашого сайту будуть доступні Admitad Tracking.
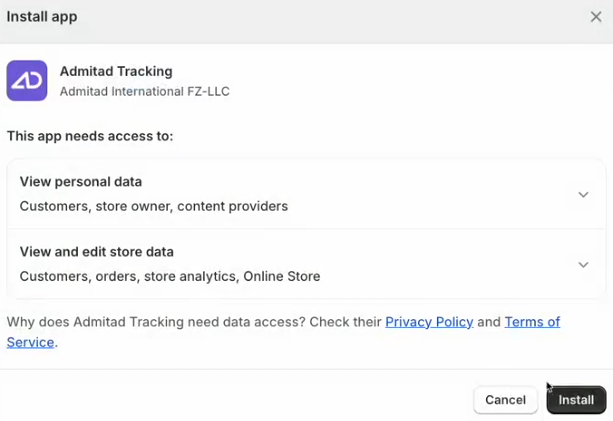
7. Натисніть Install, щоб завершити встановлення. Плагін з’явиться на головній сторінці сайту в блоці Apps, а також у Settings → Apps and sales channels.
Як налаштувати плагін
1. Натисніть Admitad Tracking у адмін-панелі сайту — відкриється вікно з налаштуваннями плагіна.
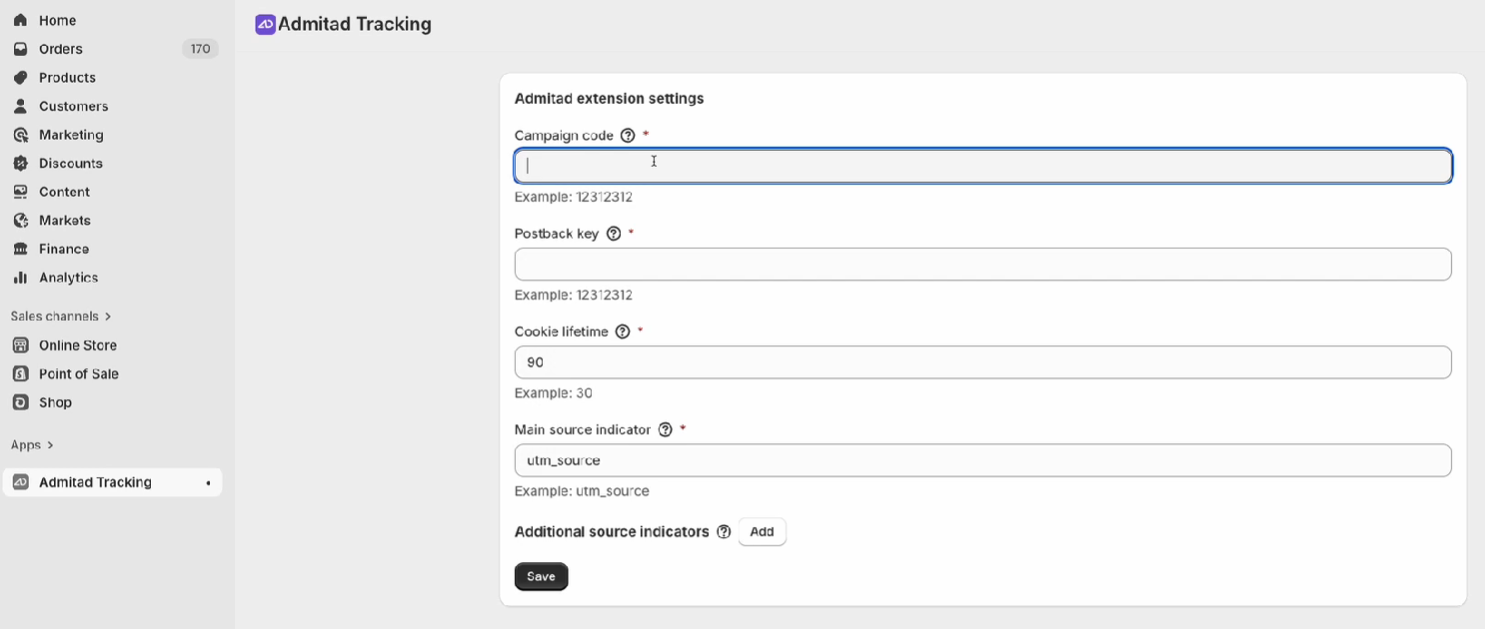
2. Заповніть обов’язкові поля:
- Campaign code — вкажіть унікальний код вашої програми в Admitad.
Як отримати значення параметра
- Postback key — вкажіть значення параметра postback_key із вашого акаунта Admitad. Це потрібно для автентифікації postback-запиту.
Як отримати значення параметра
- Cookie lifetime — вкажіть час життя cookie: кількість днів, протягом яких cookie буде активним. За замовчуванням — 90 днів.
Значення має відповідати налаштуванню Cookie lifetime у вашому акаунті Admitad (Program → General settings) і відповідати часу життя cookie, зазначеному у вашому договорі з Admitad.
- Main source indicators — вкажіть параметр для ідентифікації платного джерела трафіку. За замовчуванням вибрано стандартний параметр utm_source.
3. У блоці Additional source indicators додайте додаткові параметри відстеження за потреби. Ці параметри дають змогу ідентифікувати платне джерело трафіку в тих випадках, коли посилання цих джерел не містять основний параметр (utm_source).
Наприклад, якщо у вас кампанія Google Ads із автомапінгом, посилання можуть не містити стандартного параметра utm_source=google. Замість нього міститиметься унікальний параметр gclid. Використовуючи додатковий параметр для платних джерел, ви забезпечите коректне відстеження й атрибуцію трафіку з Google Ads.
4. Натисніть Save.
Як отримати значення параметрів postback_key і campaign_code?
Якщо у вас є менеджер, зверніться до нього по значення параметрів postback_key і campaign_code.
Якщо у вас є доступ до акаунта, ви можете отримати значення цих параметрів так:
1. Перейдіть у розділ Integration (Program → Integration).
2. Натисніть Next і на сторінці Integration methods виберіть вкладку Custom integration.
3. На вкладці Custom integration виберіть Postback і натисніть Next — значення параметрів postback_key і campaign_code відображаються в таблиці у верхній частині екрана (блок Integration setup: unique parameter values for your program).
Як протестувати інтеграцію після налаштування
Для нових рекламодавців тестування інтеграції проводиться під час онбордингу або разом із менеджером, а не через акаунт.
1. Отримайте тестове партнерське посилання на сторінці Setting up integration for Shopify у блоці Integration testing.
Як знайти блок Integration testing (розгорнути)
1.1 У своєму акаунті перейдіть у розділ Integration (Program → Integration).
1.2 Далі натисніть Next і на сторінці Integration methods виберіть Shopify. Натисніть Next.
1.3 Блок Integration testing розташовано внизу екрана.
2. Перейдіть за посиланням і виконайте цільову дію відповідно до умов вашої програми.
Рекомендації щодо тестування інтеграції:
- Додайте кілька товарів в одне з тестових замовлень, щоб переконатися, що товари й підсумкова сума замовлення передаються коректно.
- Якщо у вас є швидка або «Оформити в 1 клік» форма замовлення, оформіть замовлення через неї, щоб протестувати інтеграцію форми.
Тестове замовлення з’явиться у звітах Admitad протягом години.
Якщо після години або більше замовлення не з’явилося у звітах, перевірте правильність налаштування інтеграції. Якщо проблема не зникла, повідомте про це спеціалісту Admitad.
3. Перейдіть до акаунта Admitad → Reports → By actions і переконайтеся, що цільова дія й дані відображаються у звітах коректно:
- цільова дія відповідає налаштуванням партнерської програми;
- ідентифікатор замовлення в Admitad відповідає ідентифікатору у вашій системі;
- сума замовлення в Admitad збігається із сумою тестового замовлення.
4. Повідомте спеціаліста Admitad про завершення тестування — програму буде поставлено в чергу на запуск.
Готово! Тестування інтеграції завершено.
Як видалити плагін із сайту
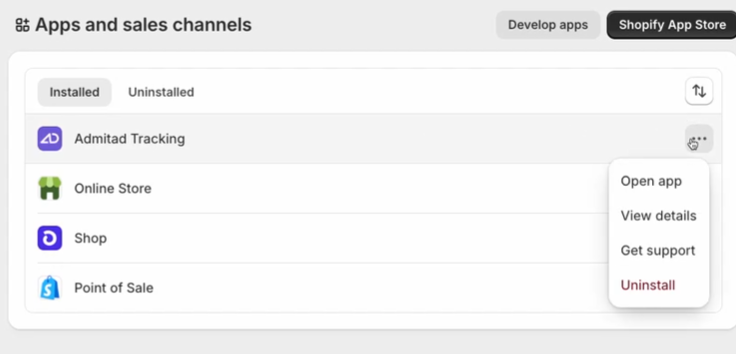
1. Відкрийте адмін-панель сайту та перейдіть до Settings → Apps and sales channels.
2. У рядку з назвою плагіна Admitad Tracking натисніть три крапки, потім — Uninstall.