If you drive contextual traffic from Google Ads straight to Admitad programs, you can set up automatic forwarding of conversions from Admitad to your Google Ads account.
Once a sufficient volume of data is gathered, you can enable Google Ads’ automated strategies for optimizing conversion costs and increasing the number of conversions.
To set up the tool, you must have an ad space of the “Media buying: Search ads” type. If you have multiple ad spaces of this type, select one when setting up the integration. How to add an ad space
Setting up integration with Google Ads
- Step 1. Setting up auto-tagging in Google Ads
- Step 2. Creating a conversion in Google Ads for importing
- Step 3. Activating the tool in the Admitad Partner Network account
- Step 4. Setting up sending conversions to Google Ads — complete this step if you have affiliate accounts in Google Ads.
Step 1. Setting up auto-tagging in Google Ads
To import conversions, activate Auto-tagging in your Google Ads account. See this guide from Google.
When this function is enabled, the parameter gclid will be added to the affiliate link when a user clicks your ad. This parameter is a unique click identifier used in Google Ads.
If a conversion follows such a click, the tool will use gclid to make sure the conversion is attributed to your Google Ads account.
The max gclid value length is 100 characters.
1. To enable the function, go to the Google Ads account where you want your conversions to be imported.
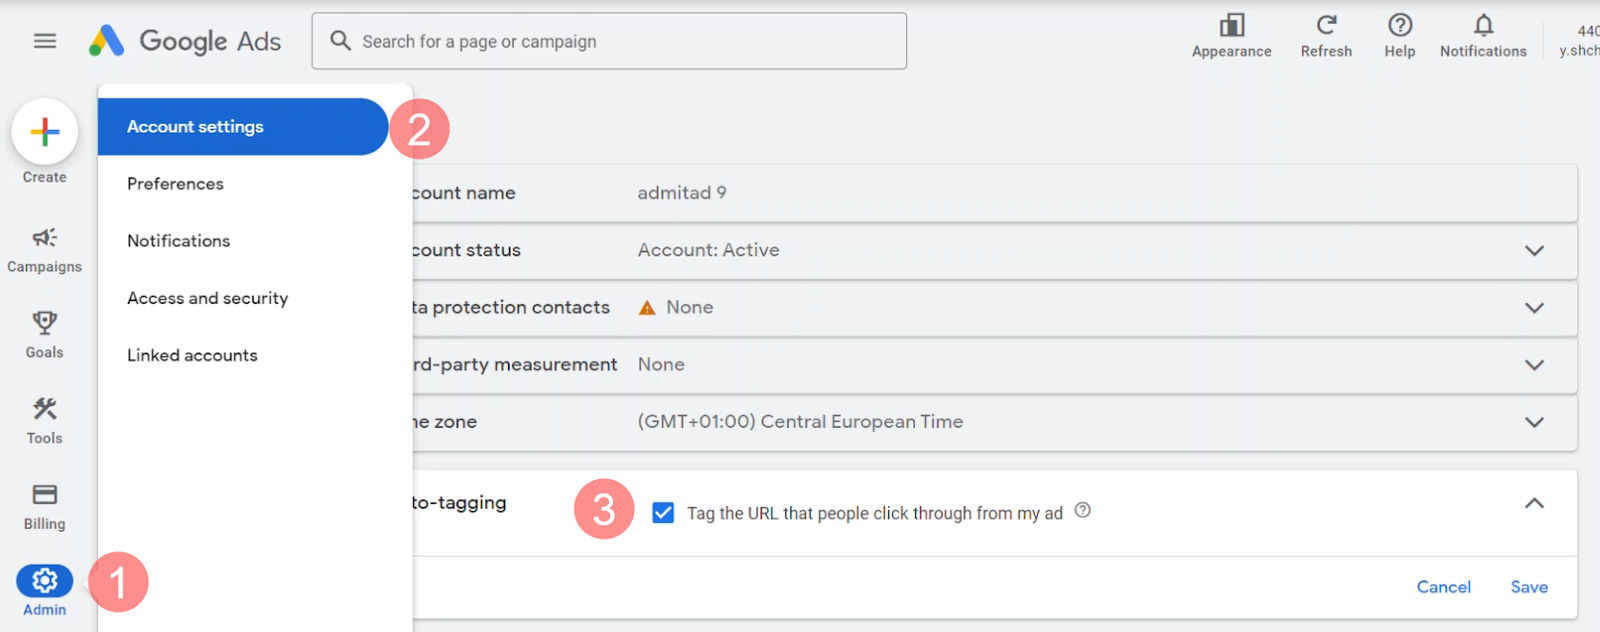
2. Go to Account settings (1) in Admin, and in Auto-tagging, check the option Tag the URL that people click through from my ad (2).
Click Save.
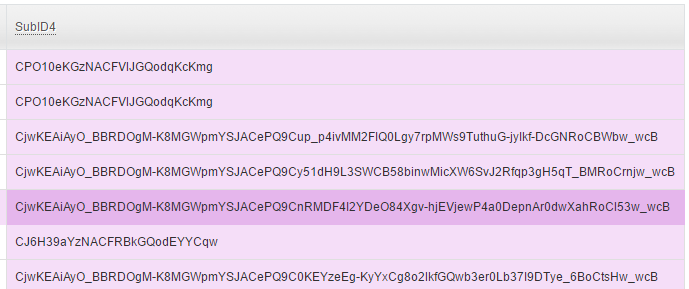
Now, if the gclid get parameter is added to the Admitad Partner Network link, its value will be stored in the SubID4 column of the Admitad Partner Network report.
If you’re already passing values to the sudid4 parameter, empty it.
Once a conversion in Admitad occurs, the tool will automatically forward it to your Google Ads account.
Step 2. Creating a conversion in Google Ads for importing
To import conversions from Admitad Partner Network, you need to create a conversion for importing. There are two ways to do this:
-
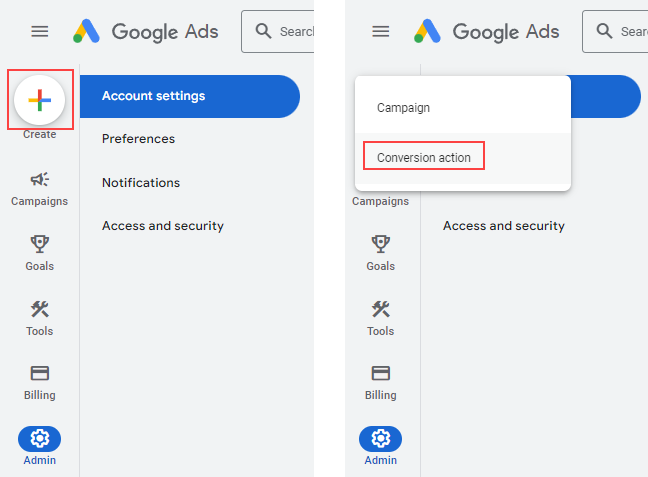
1. On the left panel, click Create and select Conversion action.
-
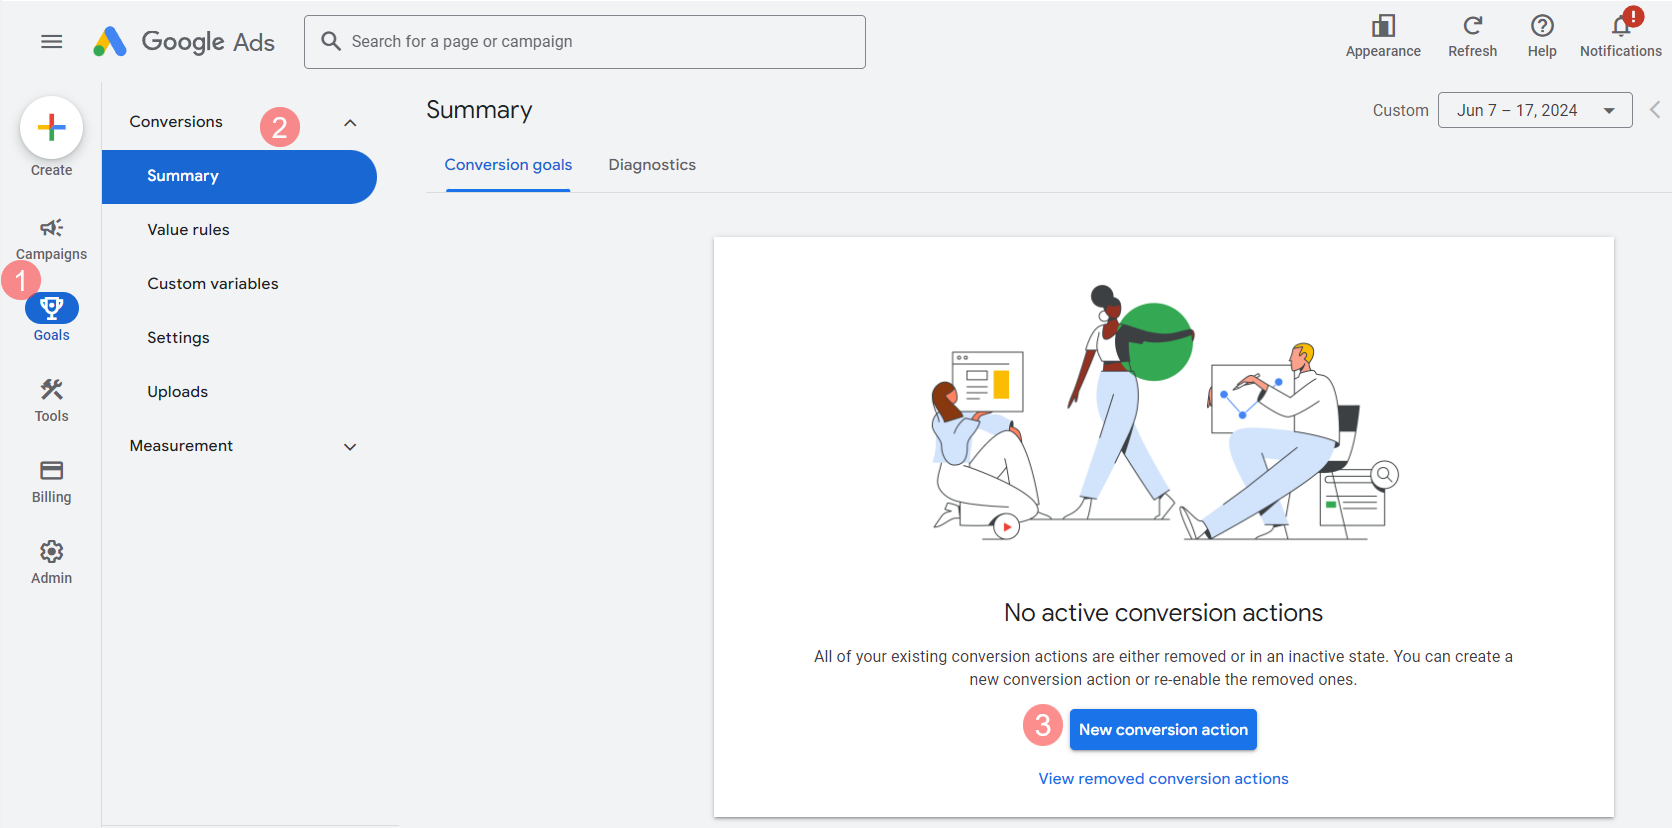
1. Click Goals, select Summary and then click New conversion action.
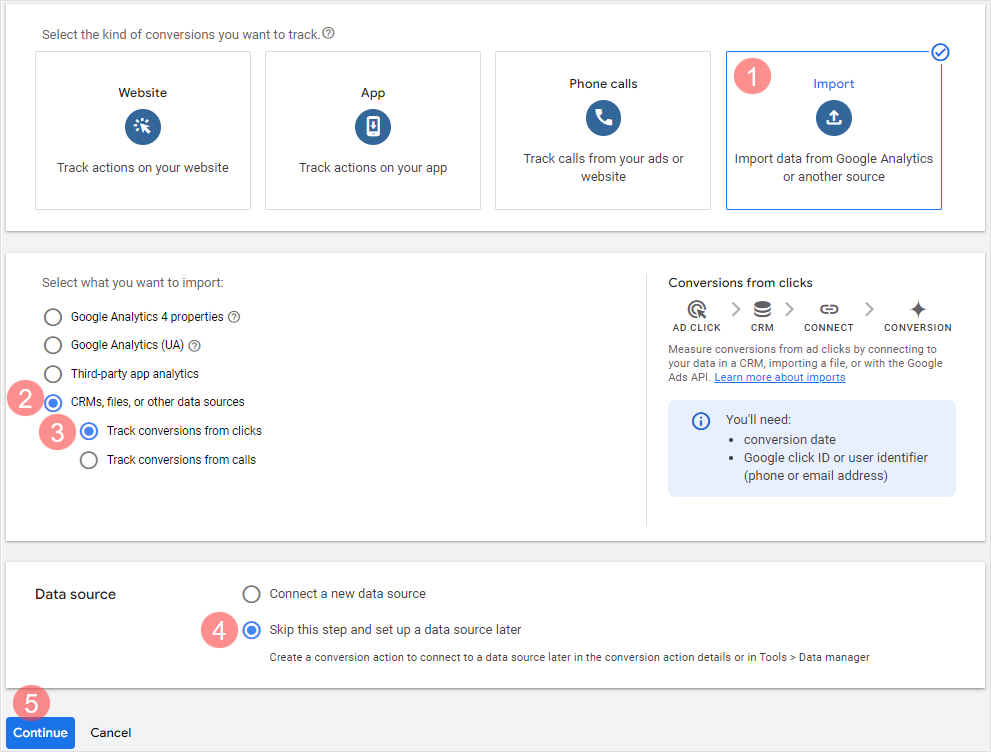
2. On the Start tracking conversions page, do the following:
- Select Import as the conversion source(1).
- In the next section, select CRMs, files, or other data sources (2) and then Track conversions from clicks(3).
- In the Data source section, select Skip this step and set up a data source later(4).
- Click Continue(5).
3. Fill out the fields:
- For Conversion goal, select Other.
- For Enter a conversion name, type sale (starting with a lowercase letter).
Then click Add.

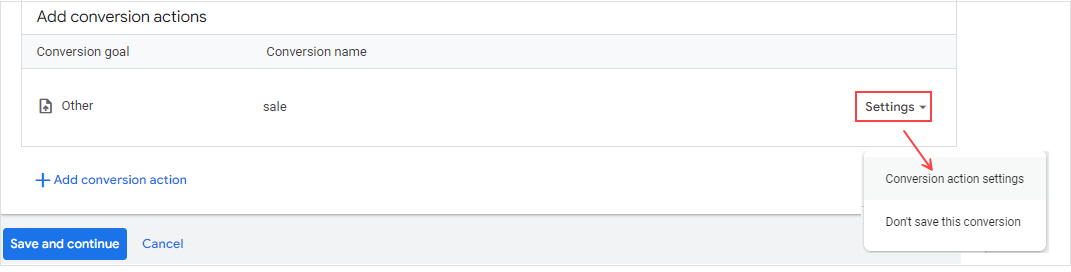
4. Click Settings and select Conversion action settings.
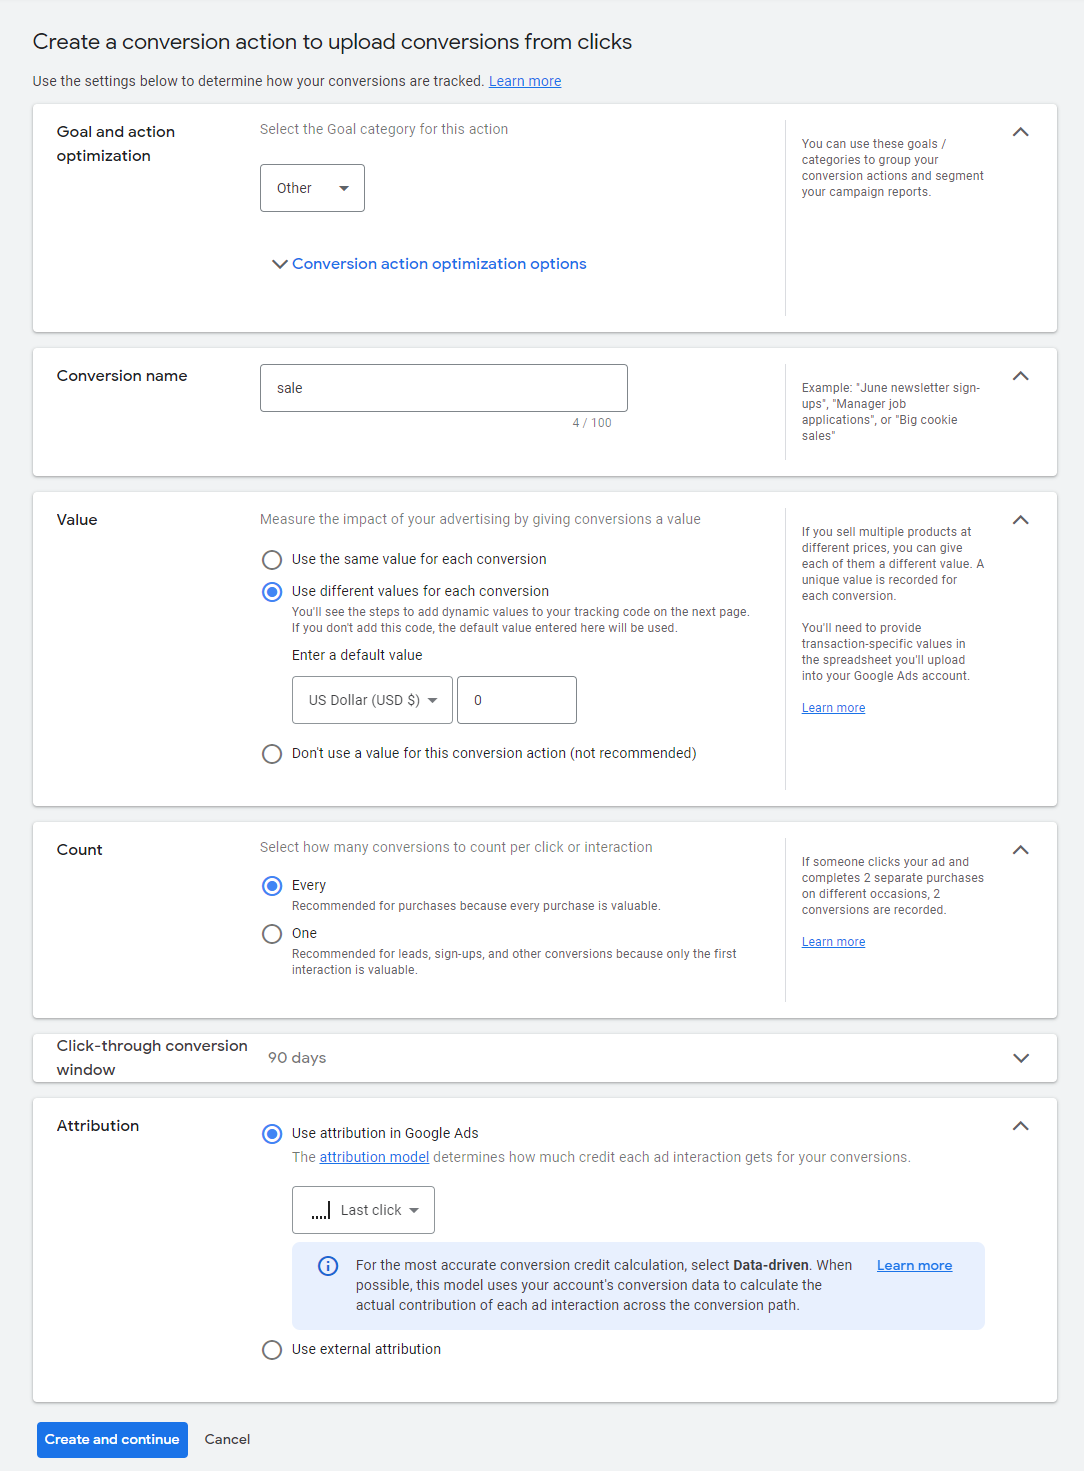
5. Fill out the form:
- Category. Other selected in step 3.
- Conversion name. sale selected in step 3.
-
Value. Select Use different values for each conversion.
In Enter a default value, specify 0.
The conversion currency must match your Google Ads account currency. Otherwise, the conversion value (in any currency) will be multiplied by the conversion currency/account currency rate every time you export your conversion.
Example
The conversion currency is US dollars, but the account currency is hryvnias. A conversion worth $1 will reach the Google Ads account with the value of 28 hryvnias. ($1 = 28 hryvnias) - Count. Select Every.
- Attribution. Select Last click.
Leave other fields unchanged.
6. Click Create and continue.
Step 3. Activating the tool in the Admitad account
After you prepare your Google Ads account for importing conversions, the last thing you need to do is enable the tool in your Admitad account.
1. In your account, go to Integration with Google Ads (Tools → Integration with Google Ads).
2. This step depends on how many eligible ad spaces you have for the Google Ads integration:
- If you have one eligible ad space, it will be selected automatically. Check the selected ad space and click Sign in with Google.
- If you have multiple eligible ad spaces, select the one you want from the list and click Sign in with Google.
The Sign in with Google button is unavailable until you select an ad space.
For the selected ad space, its name and ID are displayed.
If you see Create ad space instead of Sign in with Google, you don’t have an ad space of the "Media buying: Search ads" type. Create and verify an ad space, then return to the integration setup.
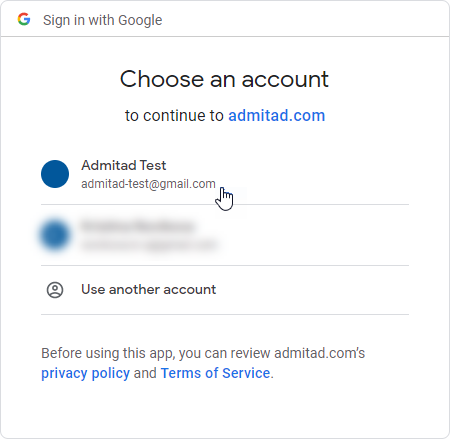
3. In the new window, select the Google account for which you want to set up conversion importing into Google Ads.
4. Grant Admitad Partner Network access to your Google account.
After that, you’ll be redirected to the tool settings page.
5. In the Client_customer_id field, enter your Customer ID and click Enable tool.
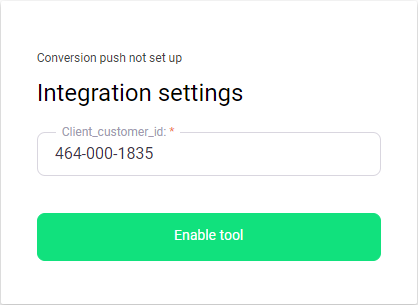
Your Customer ID is shown in the upper-right corner of your Google Ads account.
Its format is 123-123-1234.

6. In this window, you’ll see a message that conversion imports are active.
The Currency field shows the currency specified in your Google Ads account’s conversion settings. Amounts for actions parsed from Admitad reports will be converted into this currency and then imported into your Google Ads account.
Step 4. Setting up sending conversions to Google Ads
Sending conversions requires to be set up only for those Google accounts which are not used for tracking. For instance, affiliate accounts.
Don't perform this step if you use a single account for tracking and ads placement.
One management account in Google Ads can be associated with several affiliate accounts. If you use gclid of the management account for tracking and ads are placed in affiliate accounts, you need to configure sending conversions for affiliate accounts which are not used for tracking.
To track target actions in affiliate accounts, set up sending conversions from Admitad to Google Ads. Instructions from Google
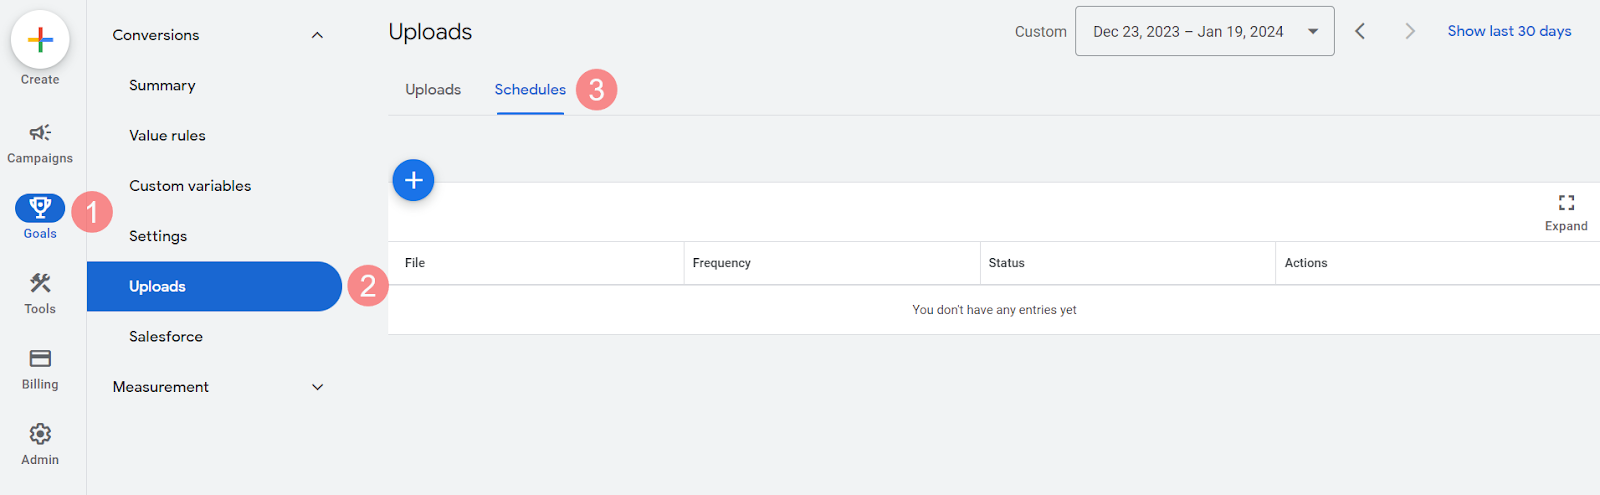
1. When setting up, in Goals (1) click Uploads (2) and select Schedules (3):
2. Click “+” and select HTTPS as the data source.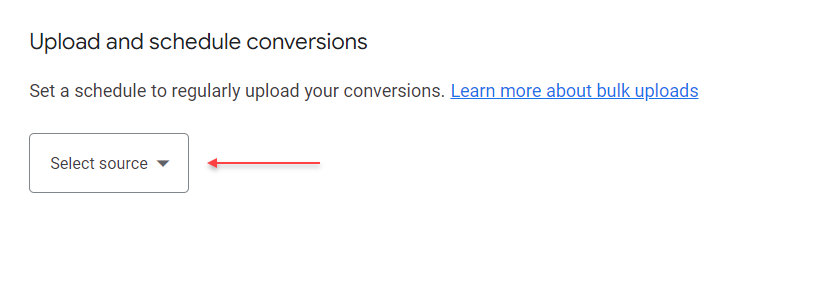
3. Fill out the fields Original URL, Username, and Password using information from the Integration with Google Ads section (Account → Tools → Integration with Google Ads).
4. Select the following values:
- In the Frequency field: Every 24 hours
- In the Time field: 12:00
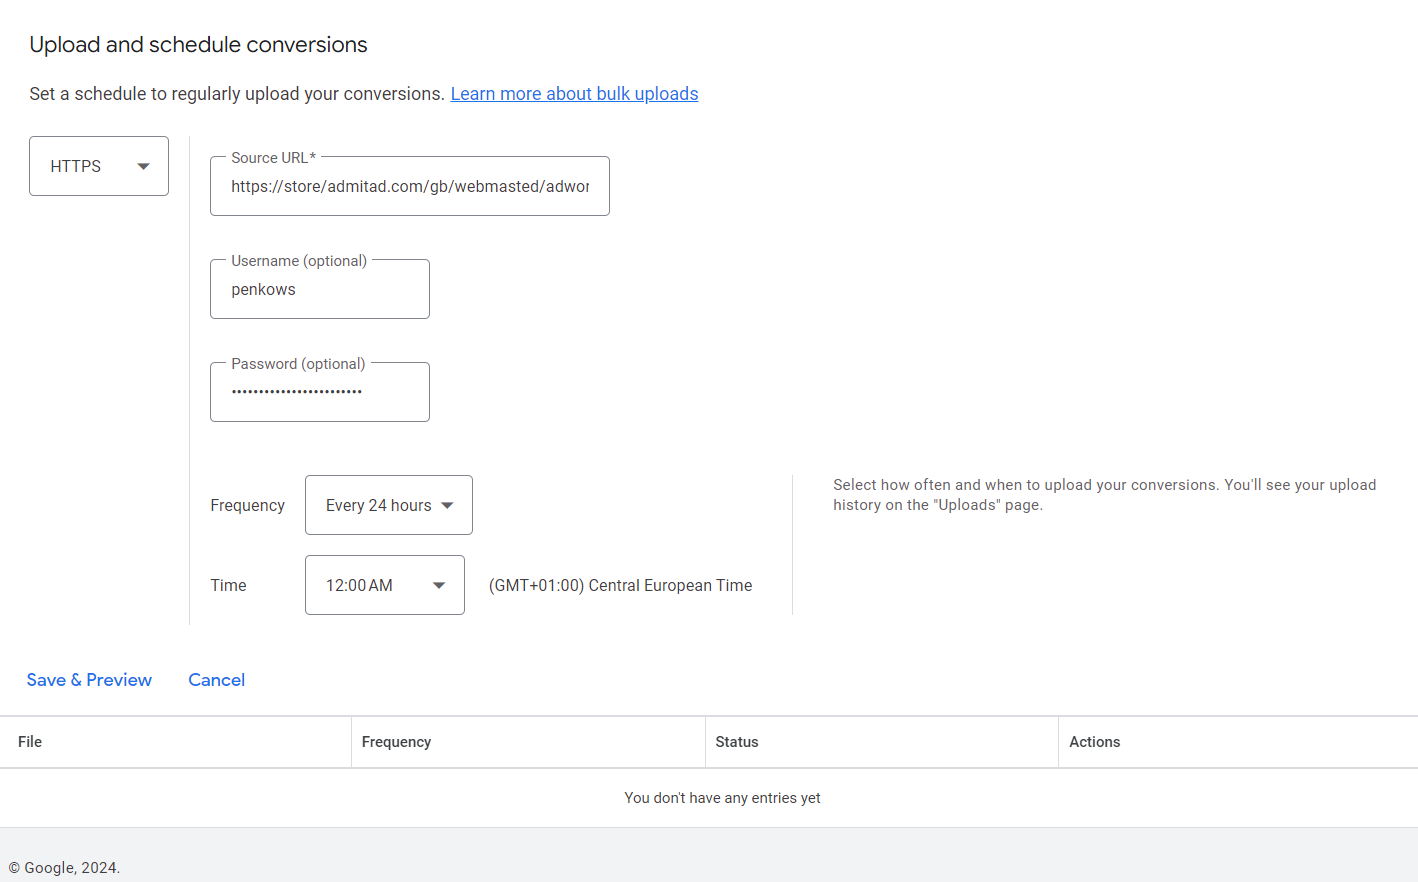
5. Click Save & Preview.
Done! You have set up sending conversions from Admitad to Google Ads.
The tool settings show the ad space linked to the integration, including its name and ID.
The integration works only with this ad space. If you have other ad spaces eligible for Google Ads, conversions from those ad spaces are not sent through this integration.
Specifics and restrictions
- Conversions are sent to Google Ads only for actions associated with the ad space selected during integration setup. If you use affiliate links from another ad space, its conversions are not sent through this integration.
- The number of conversions in Admitad and Google Ads may be different, for it takes longer to upload data to Google Ads. The number of conversions in Admitad and Google Ads will match in 5 to 7 days.
- Only use the integrated ad space for driving traffic from Google Ads. If you deploy affiliate links for this ad space in Yandex.Direct in parallel, conversions from Yandex.Direct will also be pushed into Google Ads, but the gclid parameter will be invalid. As a result, the error INVALID_CONVERSION_TYPE will appear on the tool page.
- If you use the management Google Ads account for tracking and ads placement, but you've configured sending conversions to affiliate accounts not used for ads placement, the file with conversions available by URL in the Admitad personal account will be empty in most cases. This is not an error, as the conversions have already been sent to your account, and there's no need to send them once more via the file.
- When receiving a conversion, Admitad sends it to Google Ads. If the conversion is successfully transferred via the Google Ads API, it is not added to the file.
If Google Ads returns an error (possible error types), Admitad tries to resend the conversion to Google Ads via the API, and also adds it to the file to maximize the possibility of correct transfer.
Thus, if the conversion that should be sent via the Google Ads API is added to the file, this is not an error.
Using the tool
Here’s what will happen after you set up conversion imports:
- Conversions with a GCLID that are associated with the ad space selected during integration setup will be sent to your Google Ads account;
- Conversion data will appear in the reports.
Each conversion is pushed when registered.
You can find such conversions in the Admitad Partner Network reports using the gclid value (see the SubID4 column).
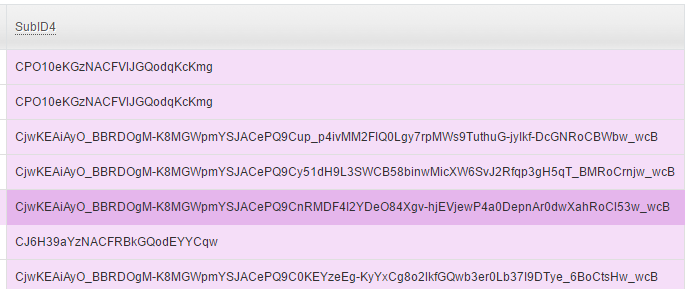
Once a sufficient volume of data is accumulated, you can optimize the cost per click and increase the number of conversions by enabling automatic strategies from Google Ads. Learn more about that in this guide from Google.
Available actions
-
To make sure the integration works correctly and conversions are imported successfully, click Check access.
A test request will be sent from Admitad.
If everything is set up correctly, you’ll see the message Data are sent successfully. Integration runs smoothly.
-
To suspend the tool operation, click Pause.
Conversion imports will become inactive.
If you need to resume the tool, click Enable tool. You won’t have to set up integration over again.
-
To end conversion imports and disable integration, click Delete.
You’ll then be able to reconfigure the tool if you need to. For instance, you can integrate it with another Google Ads account. In this case, you’ll have to set up integration over again.
If you have multiple eligible ad spaces, you’ll need to select an ad space again when setting up the integration again.
If an error occurs when importing a conversion into Google Ads, you’ll see the error code and a link to the Google document with an explanation.
The tool will try to import this conversion again once every 24 hours until it’s registered.
Possible errors
Errors may occur:
When setting up the integration
| Error | Solution |
| Invalid format of client_customer_id. Required format: 123-123-1234 | Check сlient_customer_id. You can find it in the upper-right corner of your Google Ads account, above the email address. |
| Invalid client_customer_id. Make sure your Google Ads account is associated with an active Google account. |
This error may occur if you have several Google accounts, each of which is linked to a Google Ads account. Make sure you’re specifying the client_customer_id of the account to which you have granted Admitad Partner Network access. If you selected the wrong account when granting access, go back to the tool page and disable integration (click Delete). After that, set up integration again. |
| The currency of your Google Ads account is now allowed in the system | In your Google Ads account, you specified a conversion value in a currency that is not supported by Admitad Partner Network. Since you can’t change the account currency, you can’t link this account. |
When sending conversions
There are two types of errors that may return from Google Ads when sending conversions:
-
A conversion with this timestamp and GCLID already exists. Fix: Remove this from the file or make sure the timestamp is correct.
This means the conversion was already created earlier. You don't have to fix anything. In some cases, Admitad sends conversions to Google Ads two times. For you, this error is just a notification.
-
The conversion can't occur before the click.
This error occurs when Google Ads tries to send a conversion but an associated click hasn't been created yet. You don't have to do anything. Admitad will send this conversion to Google Ads at the next syncing.